
The following is based on an article originally published in issue 284 of Furniture & Cabinetmaking.
In 2017 a client commissioned me to build an open cupboard for the hallway of a Victorian house in London, with the key design criteria that it was to be able to provide ample shoe storage. The result was the Policeman’s Boot Bench – a dovetailed oak cabinet with four shelves for even the most enthusiastic shoe collector. No sooner had I completed the commission and handed it over to the client, then Dr Moss pointed to the overflowing shoe rack in our own hall and requested that I build a variation on the piece I had just delivered, to address our shoe storage needs (the finished piece can be found here).

Iterative Design
The process of designing, and building, a second interpretation of an existing project provides an excellent opportunity to review your design process: both in terms of how small design changes can have significant impact on functionality, and how design choices affect the overall form of the piece. Subsequent approaches do not rewrite the base design, but adapt and mould it to new settings and uses that reflect the specific needs of the end user.

Despite my best efforts, I have been unable to find a design term that reflects the process of adapting a base design for different functionality or aesthetic criteria, and so for the purposes of this article I will refer to it as “iterative design”. If any reader is aware of a design term which better reflects this methodology then please drop me a line and let me know!
Compare and Contrast
While I will be using the two shoe cupboards to illustrate the benefits of iterative design, really the same process could be applied to any furniture form. In fact, on my workbench are two child-sized Welsh stick chairs. These chairs are both based on an 18th century example, but thanks to changing some design elements (one has a round leg profile while the other uses octagonal legs) and material choices (one is oak, the other maple), they have radically different appearances. Returning to the shoe cupboards:
Version One (the original Policeman’s Boot Bench) is all oak construction, with four full-width shelves housed in dados. The finish is blonde shellac and black wax.
Version Two (which resides in our hall) has the same overall proportions, save for being slightly narrower (11.5” compared to 13”). Pine is used throughout, and the joinery (dovetails, dados, and tongue and groove for the backboards) is exactly the same as for Version One. However, there are three shelves in this iteration of which only the bottom shelf is full-width. The other two shelves terminate in a vertical divider 12” from the righthand end, resulting in a tall compartment at that end. At the top of the compartment is a dovetailed drawer for keys, post, and the inevitable clutter that seems to accumulate by the front door. The shelf spacing is also different compared to Version One. In terms of finish, the exterior of Version 2 is painted with Bayberry Green milk paint by Old Fashioned Milk Paint, topped with Osmo PolyX, while the interior is also treated with Osmo. The dados are pinned with “Roman” style nails from Rivierre Nail Factory, while a Mackintosh brass pull from Horton Brasses allows the drawer to be accessed.

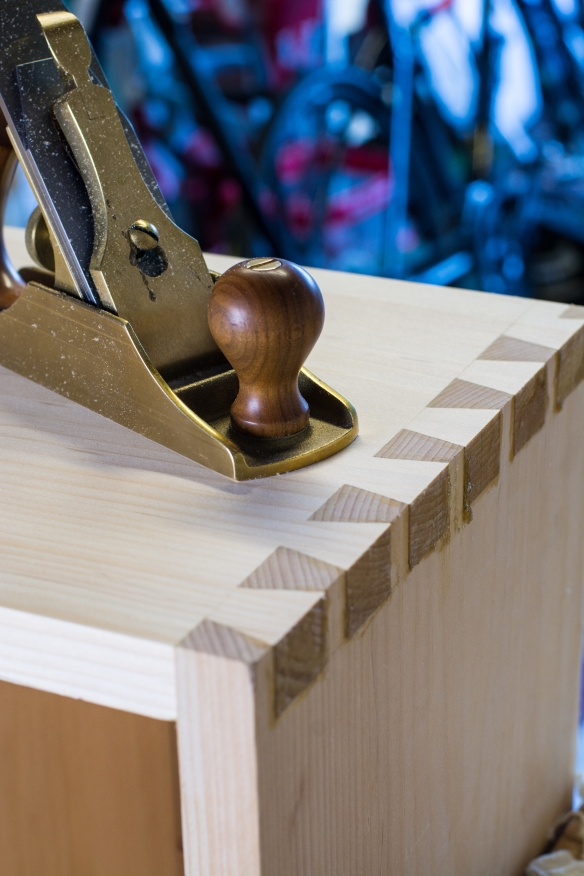
Cutting the dovetails
So those are the differences, but what design choices led to them? This can be split into two elements – functionality and aesthetics.
Functionality – adjusting the functionality of the shoe cupboard was where negotiations started for version two. Our existing shoe rack (by a popular Swedish home furnishing company) struggled to accommodate anything larger than a standard work shoe, and was downright hopeless at holding the Apprentice’s tiny shoes. So, from the very start we knew we needed shelf spacing that would work for my Dr Marten boots as well as a three year old’s favourite sequinned wonders, and Dr Moss’ knee-high boots. The addition of the vertical partition provided the tall boot storage without creating too much unusable dead space, and left me free to have shelves in the main compartment. Having determined the space required for the Dr Marten’s (8 ½” in case you were wondering), the shelf spacing for the main compartment was stepped off with dividers to achieve a gradually reducing space for each shelf up, without the need to deal with awkward fractions. A small drawer at the top of the full height compartment added an extra level of functionality as well as some visual balance to the design – before adding the drawer, the right-hand compartment looked cavernous and disrupted the proportions of the piece.
Aesthetics – the Policeman’s Boot Bench was designed for a Victorian property with an original tiled hallway, and the emphasis on oak and a simple finish fitted that setting very nicely. Thanks to a large lime tree in the front garden our hallway has a tendency to be gloomy, and in an effort to mitigate this we have painted the walls a bright yellow. For this reason we wanted to avoid adding large pieces of furniture in dark wood, and so pine was chosen for gentle tones it would add. The overall form of the shoe cupboard is understated, and relies on hand cut joinery as well as an elegant foot detail to provide visual interest. Milk paint is the perfect finish for adding colour while keeping joinery visible, and the benefit of a mid-toned colour is that the natural wood of the interior illuminates the shelves, making the overall piece “pop”.
These are all simple choices – asking what we want to use a piece for, and how it will sit in the intended setting. And yet, when added together, they result in substantially different pieces.

Cleaning out dados
The Benefits of Iterative Design
Having found the iterative design process to be beneficial and thought-provoking, I was interested to see if other makers used this process. Canadian furnituremaker Rich Wile makes extensive use of this approach, particularly when deploying specific joinery solutions. Rich explained that while he developed a “chair base design using bent laminated braces” for a dining chair, “it has provided the design and build basis for many other projects including benches, stools and small tables. Each application requires small tweaks to the design, such as the size and angle of the brace, but the technique remains the same”. Carver Danielle Rose Byrd also makes use of iterative design, particularly with spoons and shrink pots which “are limited to more nuanced changes in design that benefit from an iterative design process”.
I have found two main benefits to this process, although I am sure there are plenty of others I’ve not yet stumbled upon. Firstly, once the base design has been prepared, creating further iterations is a more time-efficient process, because the overall form (proportions and joinery, not to mention the construction process) have already been established. Instead, subsequent design time is focused on making adjustments to achieve a different functionality aesthetic, or to accommodate different materials. Those efficiencies are not confined to the time spent on design either. As Rich explains: “I tend to over-engineer a piece with extra structure or support the first time around. But the experience of each subsequent iteration allows for refinement or efficiencies to develop in the built to either save material or time, or to increase the flexibility of the design”.

Dovetails for the first corner
Secondly, having an established based design already built (iteration one – in my case the Policeman’s Boot Bench) enables the impact of each design change to be readily compared and contrasted. Again, that might be in terms of functionality, or appearance. By expanding the uses of a base design, you develop an understanding of what functionality can be achieved within a given footprint or internal fitout. This reflects Danielle’s experience, as “it’s one thing to see a new pattern carved onto a flat board, but being able to use an actual shrink pot so I can see how the pattern relates to the shape of it allows me to make better informed decisions about what ultimately gets used on the final piece”, and for this reason she keeps all of her “practice boards and failed past projects”.
The Drawbacks of Iterative Design
No design process is perfect, so are there drawbacks to iterative design? The obvious one, to my mind, is that any process based on repetition or making adjustments to a base design, has the potential to limit design language and result in a narrower breadth of work. Danielle’s experience would support this, and suggests that “iterative design holds me back – I tend to think smaller, be more conservative, and limit myself”. Richard adds that “I think you can become too comfortable with your ‘hammer’ and perhaps have a blind spot for other approaches”, although staying interested in other makers’ designs and approaches can counterbalance that risk.

Conclusion
Within the context of a broader approach to design, I’ve found that iterative design can be a useful tool, and one which has some very beneficial attributes. What I find really interesting about using the Policeman’s Boot Bench as a base design is that making changes to the internal layout requires only moving the location of the dados, which really emphasises the flexibility of both the joinery and the design. As Rich observed about his own experience with iterative design “when the project I am building can [make use of an established design feature], I know I can rely on solid experience and approach, and focus on details and aesthetics and not on behind the scenes building techniques”.
At its root, this iterative design process is about developing a design language and experimenting. In fact, the more I dig into this as a process the more I find that I am engaging in a design conversation with myself and the overall brief of the project. Building that design language presents the opportunity to explore ideas, and draw upon previous experience to trial new approaches As Danielle explains, “when I first got into bowl carving, I set aside ten or so maple bowl blanks and let myself go wild on them, entertaining any and every idea I had so I could find the extremes of what was possible, including texture. I also have bowl failures that I keep around. This comes in handy during the iterative design process because it allows me to easily expand on previous ideas that I’ve hashed out on these testers seemingly picking up where I’ve left off”.

Bowl by Danielle Rose Byrd
This represents my first forays into iterative design, and the experiences of some other makers. And so, I shall finish with a challenge – next time you come to design a piece, ask yourself if you need to start from scratch, or whether you have already built a base design that could be adapted. This approach may save you time and provide some unexpected results.
