(2010-05-20) Creating Navigation Bar Links For A Subset Of Objects In FIM 2010 (Part 2)
Posted by Jorge on 2010-05-20
In part 1, I created the Search Scopes. The next step is the creation of a Navigation Bar Links for EACH subset you have/need. So for this scenario I created 5 Navigation Bar Resources/Links as shown in the picture below.
Like with the Search Scopes I’m not going to provide all the details for all the Navigation Bar Links, but rather just two of them (Complete Set and 1 subset). With that you should understand how the other 3 are configured. To create Navigation Bar Links, click on the "Administration" Navigation Bar Link, and then click on "Navigation Bar Resources" in the list. Click NEW.
Navigation Bar Resource for the Complete Set called "All Computer Systems"
Tab "General"
I specified a "Display Name" and a "Description" for the Search Scope.
I specified the same "Usage Keywords" as in the corresponding Search Scope ("All Computer Systems").
Tab "UI Position"
I specified a "Parent Order" to position the parent link "Computer Systems" in the Navigation Bar. The lower the number, the higher the Navigation Bar Link is positioned. The higher the number, the lower the Navigation Bar Link is positioned.
I specified an "Order" to position the sub-link "All Computer Systems" in the Navigation Bar below the parent link. However, the parent link always has order 0. But still, the lower the number, the higher the Navigation Bar Link is positioned. The higher the number, the lower the Navigation Bar Link is positioned.
Tab "Behavior"
I specified a "Navigation URL to point to the previously created corresponding Search Scope. The link consists of three parts being:
<Common Relative Part for Custom Objects><ObjectType><Common Relative Part for Custom Objects><ObjectID Corresponding Search Scope>
e.g.: ~/identitymanagement/aspx/customized/CustomizedObjects.aspx?type=Computer&searchtype=6b5da18c-3ce7-444c-aca4-efc0fb282bd5
I specified the "Resource Count" in the form of an XPATH filter which will calculate the number of object that fall within that scope. See the very first picture this post. It is not mandatory to specify this option and remember it has a performance impact on the system because it needs to calculate the number from time to time.
Tab "Localization"
Bot needed and not configured in this case.
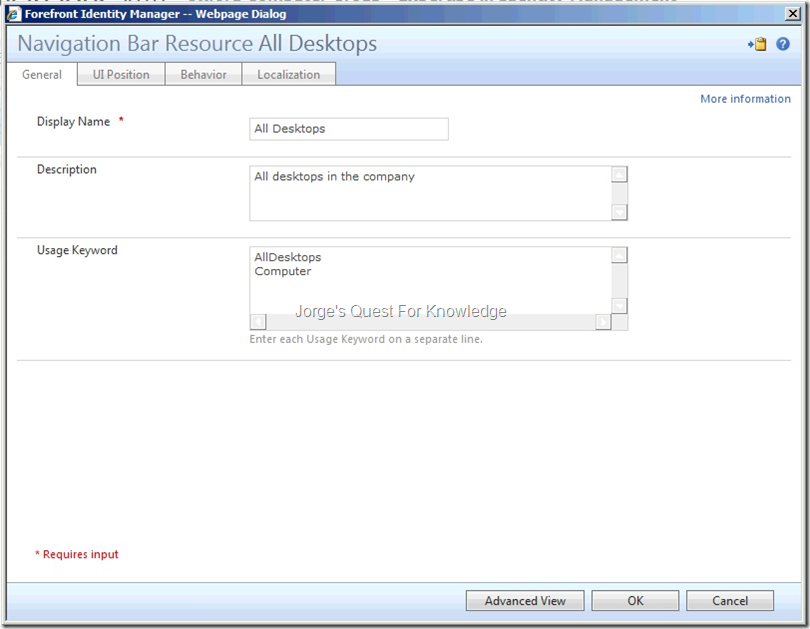
Navigation Bar Resource for the Complete Set called "All Desktops"
Tab "General"
I specified a "Display Name" and a "Description" for the Search Scope.
I specified the same "Usage Keywords" as in the corresponding Search Scope ("All Computer Systems (Desktops)").
Tab "UI Position"
I specified a "Parent Order" to position the parent link "Computer Systems" in the Navigation Bar. The lower the number, the higher the Navigation Bar Link is positioned. The higher the number, the lower the Navigation Bar Link is positioned. Because it is a sub-link it has the same parent order as the parent link itself
I specified an "Order" to position the sub-link "All Desktops" in the Navigation Bar below the parent link. But still, the lower the number, the higher the Navigation Bar Link is positioned. The higher the number, the lower the Navigation Bar Link is positioned.
Tab "Behavior"
I specified a "Navigation URL to point to the previously created corresponding Search Scope. The link consists of three parts being:
<Common Relative Part for Custom Objects><ObjectType><Common Relative Part for Custom Objects><ObjectID Corresponding Search Scope>
e.g.: ~/identitymanagement/aspx/customized/CustomizedObjects.aspx?type=Computer&searchtype=6b5da18c-3ce7-444c-aca4-efc0fb282bd5
I specified the "Resource Count" in the form of an XPATH filter which will calculate the number of object that fall within that scope. See the very first picture this post. It is not mandatory to specify this option and remember it has a performance impact on the system because it needs to calculate the number from time to time.
Tab "Localization"
Bot needed and not configured in this case.
Now you have created the required objects it is time to check if your work results in what you want. Close Internet Explorer. Open an administrative command prompt window and type IISRESET and hit enter. When started again, open Internet Explorer and navigate to the FIM portal URL and check if the new Navigation Bar Links are shown and return the required results as envisioned.
Have fun!
Cheers,
Jorge
———————————————————————————————
* This posting is provided "AS IS" with no warranties and confers no rights!
* Always evaluate/test yourself before using/implementing this!
* DISCLAIMER: https://jorgequestforknowledge.wordpress.com/disclaimer/
———————————————————————————————
############### Jorge’s Quest For Knowledge #############
######### http://JorgeQuestForKnowledge.wordpress.com/ ########
———————————————————————————————


(2010-05-20) Creating Navigation Bar Links For A Subset Of Objects in FIM 2010 (Part 1) « Jorge's Quest For Knowledge! said
[…] with part 2 about this […]
LikeLike
Finding All Users Within FIM That Have (Not) Registered For SSPR « Jorge's Quest For Knowledge! said
[…] (2010-05-20) Creating Navigation Bar Links For A Subset Of Objects In FIM 2010 (Part 2) […]
LikeLike