I need to stress that I can only say that this works with my own set up, so there may be differences between mine and what you use. But I’ve detailed my rig below. I need to also say that I’m in no way affiliated with any of this software or hardware and nor am I receiving any form of payment for endorsing it here. It’s simply what I use and I wish to share how I go about my imaging with you.
Since originally writing this walkthrough Stellarium has been updated and I referenced the StellariumScope standalone program for telescope control within there. Since the recent update though, Stellarium no longer needs that and can operate telescopes from within itself. The walkthrough has been updated to reflect these changes which came into effect from version 0.19. The current version (as of this update) is 0.20.
Setup
Mount: EQ5 Pro
Scope: SkyWatcher 72ED
Camera: ZWO ASI178MC (non-cooled)
Guidecam: ZWO ASI120mm (mono)
Software: ASCOM platform, SynScan, PHD2, Stellarium, APT
Setting Up Stellarium For Use With APT
Stellarium is a great piece of software that you can use for various aspects of astronomy and astrophotography. I’ll admit that when I first installed it I had a quick look and said “OMG, that’s way too complicated” and left it for some time. Actually my language had some more colourful metaphors if I’m brutally honest…But over time I’ve managed to integrate it more and more into my astro work until I’m now at the point where I’m ready to use it to control what the mount does and where she points.
Stellarium uses a set of plugins in order to control the mount correctly. For what I do, these plugins are: Oculars, Remote Control and Telescope Control.
The first thing you want to set up is the Ocular plugin. 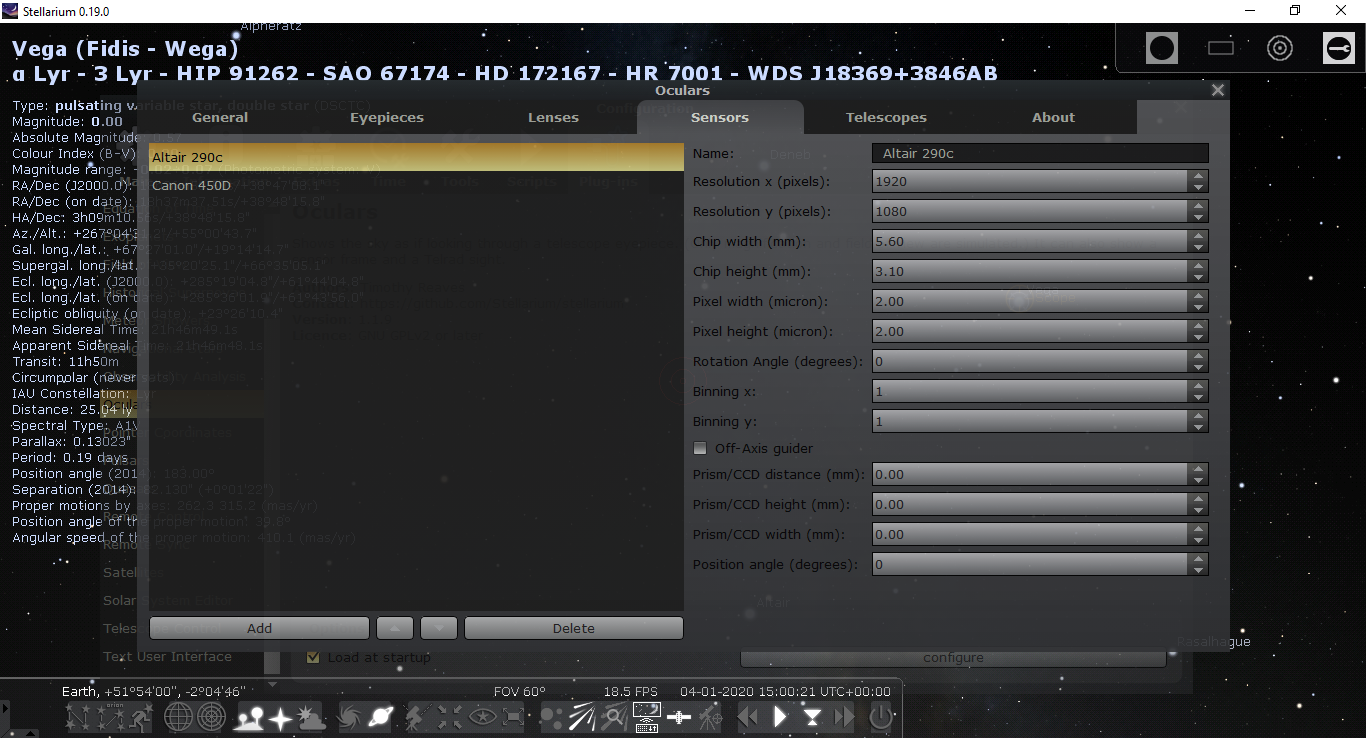
Open up Stellarium and go to the left side until the toolbar opens, and then click on the spanner icon (Configuration.) From there select the Plugins tab and then scroll down the left of that box to Ocular. You can see from the above screenshot that my camera specs are already entered. But this is the sort of thing you need. I also have similar information for my 450D. But in both cases I looked up the needed information from the manufacturers websites.
From there, go to the Telescopes tab and populate the information specific to your own ones, as I’ve done below.

Once you’ve done that, close the plugins, exit Stellarium via the close program button on the bottom toolbar (this opens the same way you opened the right side one.) Restart Stellarium.
Open up the Configuration again, go to plugins and then scroll down to Remote Control. Tick “Load at startup” and then press the “Configure” button. This will open a new box that I’ve configured as per the screenshot below.

I then save this as my default and exit out, closing Stellarium the same way as above. I close it this was because I’ve found that if you close it via the top right window icon, the settings don’t always save and you end up having to do it all again.
Now open up APT. Go to the Tools tab and then select “APT Settings.” From there go to “Planetarium” and make sure the settings in there correspond to the ones you entered into the “Remote Control” in Stellarium, as I’ve done here.
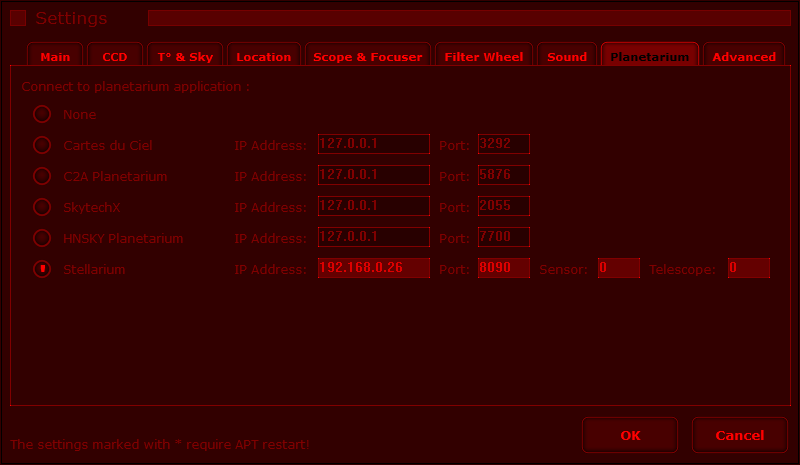
Assuming that you’ve only got the one camera and telescope then the Sensor and Telescope fields above will be “0.” If you have others, then the next one (of either) will be 1, 2, 3 respectively. Stellarium takes the first camera / scope as zero and works up from there.
Press OK and then exit out of APT as normal.
So, the way that I would open up my programs for an imaging session would be as follows:
Open Synscan, connect to mount and restore hibernation data when it asks. PHD2, and connect the mount ONLY. I would then carry out a polar alignment using the tool in SharpCap (covered in a previous walkthrough.) After polar aligning and closing SharpCap, I’ll then return to PHD2 and connect the guidecam and set it to loop the images. Then open Stellarium. After that I open APT. You can tell if you’ve been succesful with the above by looking at the live logging in APT. It will show that you’ve connected to Stellarium.
I haven’t yet used Stellarium in a “live” situation, due in main to our glorious British weather. But having tested it indoors, it seems to work pretty flawlessly, and syncs between itself and APT nicely. Imaging and guiding you would carry out via APT and PHD2 as normal. You can use Stellarium whilst it’s doing that to have a look around and see what else is in the night sky, and plan your framing etc whilst still imaging.

Thanks for that. Was struggling a bit and this sorted things out for me
LikeLike
Fabulous, that’s great to know 😊😊 Many thanks Stephen
LikeLike
I’m just trying out APT but I’ve been using Stellarium for a while. Thanks for the tutorial, it helped a lot and fortunately worked 1st time.
LikeLike
Awww fab, thank you, that’s really good to know 😊😊😊
LikeLike