I can still wear some of my jeans if I make a buttonhole extension using a hair elastic which lets the waist spread to a comfortable circumference. But the jeans and pants I can wear (with that little cheat) are winter or at best 3 season wear. The season they can’t be worn in is now, Summer. I am jean-less for hot weather. I purposely shopped for lighter weight denim purchasing 2 cuts of 8.5 and 9 oz denim several weeks ago. After sewing angel started talking , I had to have summer weight jeans now.
I haven’t made jeans since I discovered Diane Gilman at HSN. None of my DG2 jeans are wearable during this heat wave. Much too hot. Somy Trudy Jansen Designer jean pattern comes out of the box.
I’ve loved this jean pattern from the very first pair I made. Over the years I have made many variations. I think the secret is a unique crotch shape combined with a center back leg seam. That CB seam lets me really fit under and over my seat. This jean has always been easy for me to fit.
I started the current pair by checking my hip and waist measurement. My hip puts me in a 20 (yes I have gain that much) but my waist is not on the chart! My solution was to measure the waist band which led me to believe that the largest size would work for my waist. I traced the largest size then pressed the wrinkles out of the 9oz cotton/lycra denim (10% stretch) and laid both fabric and pattern out on the cutting board. For now the pockets are traced but set aside. I probably won’t add the front pockets to this pair. I can lie to myself about fit when using front pockets–so no pockets at least during fitting. While I’ve gotten much bigger around, I am not any taller. I knew without a doubt the 35″ inseam was a mistake. So the only change I made was to reduce leg length 2″.
After stitching the zipper in the front, I installed water-soluble thread in the bobbin; contrasting thread in the needle and started basting the rest of the pieces together. So glad I was using WST because I forgot to stitch the yoke to the back leg. Duh! I’d say a blonde moment but right now I have very little fuzz on top and it is all a brilliant white. Anyway, ripped out seams as needed; added the yoke, waistband and WB facing. Held my breath and went for the first fitting.
Son of a gun, they nearly fell to the floor!
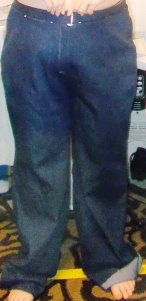
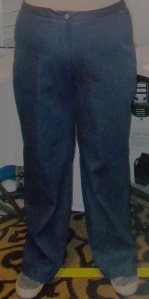
I had to hold them up for pics. — BTW the pics are much lightened so we can see the wrinkles. My fabric is a medium-dark blue. Doesn’t photo well for sharing purposes but looks good IRL.– You can’t imagine my joy at needing a smaller size. In fact, TWO sizes smaller.
For the second fitting,I pinched at the WB side seam and then in the leg just to see how much excess circumference I might be looking at. Removed the WB past the side seams and stitched the side seams another 1/2″ deeper before replacing WB and taking 3rd set of pics.
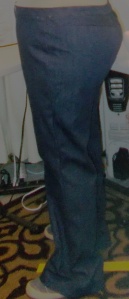
I’m not having to hold them up but they did feel a little loose at the waist. Nearly every time I refit this pattern, I need to scoop the seat just a bit (takes care of most of the crotch issue) and stitch the center-back leg seam just a little deeper below the seat. At this fitting the leg is too long and when I look at the sides….
… I think the sides are too long as well which is another one of my common issues. Still that butt looks nice. I always say I don’t have a flat seat, think this proves it.
For third fitting, for which I am not sharing pics, I shortened the side length 1.5″. There is a trick to doing this when dealing with a yoke. The yoke has to be unstitched and offset to the upper leg. Since the crotch doesn’t need to be adjusted the offset only goes half way across the side-leg piece. A little tricky but does the job nicely. At the same time I restitched the side seams I wanted to snug the waist. So I made the side seams 1/4″ deeper at the top of the leg . Replaced the WB but angled across the front and front SA to line up the top of the back SA. It’s an alteration that is easier to do than to describe. . When I took pics of the last fitting I pinned up the hems to determine how much still needed to be removed from leg length.
To finish, I serged along all the basting lines trimming away all the excess. OK, I did have to open the seams where seams crossed such as the yoke and side seam. To tweak the waistband, I added elastic between WB and its facing. I skipped the pockets and the belt loops. I’m not really a belt wearer. The finished jean:
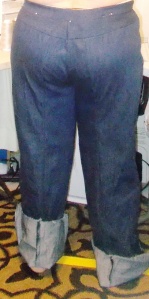
That’s the worst the back looked through all the fittings. Looking at it now I realize I was taking in the side seams at the top of the leg to adjust the waist fit. With this waistband, little darts have to be placed in the WB to adjust the fit at the waist. The places to make the darts are even indicated on the pattern. Taking in the side seam at the top of the leg, adjusted 2″ below the waist. Hence, the waist is still a little too big and the back droops a little. The side seams may still be too long and there may still be too much circumference. Because I used a stretch fabric, I could have achieved a closer fit i.e. removed more circumference. However, I have several jean-type fabrics that are non-stretch. I want my TJ906 jean pattern usable with them.
The very BEST thing about this pattern: instead of working for days and weeks before giving up, in only TWO DAYS I have a pair of jeans I am happy to wear. Love this pattern.
Love it. Love it. Love it.
*****************************
Summary of Changes
- Shorten leg 3″
- Shorten side seam length 1.5″
- Trim 1/2″ from side (reduces circumference 2″)
Needed change
Add 1/4″ darts on WB


My hat’s off to you — fitting pants is a royal pain. After miserably failing with a re-fit of my former slim pant TNT (weight gain) I gave up and switched to loose culottes-type pants (Sewing Workshop West End) 🤷♀️
I know the feeling of having a pattern that used to fit and struggling to make it currently dit.
They look great!
Regarding the elastic issues with your ever changing waist measurements, have you considered using the elastic that has the buttonholes every few inches so you can adjust during the day as necessary? I’m guessing it is still available to buy.
It is still available. I even have some but no never think to use.
I am SO PROUD OF YOU. You inspire me with your persistence. Thank you!
I have to admit, it is a lot about luck. The lucky combination of well drafted pattern, for your type body combined with the right fabric. It is so great when they all come together to make a nice pant.
Bev, wow, seeing jeans from many blogs, your fit is among the best. You look great! Those center leg seams seem to be the way to go with a jean pattern.