How to set up Magic Hidden Fields
Magic hidden fields are database fields that have their own “magical” function. This article contains a list of available magic hidden fields and explains exactly what a magic hidden field does. In the present article, we will focus on how to set up these magic hidden fields. Setting up the magic hidden fields is a very simple process. The first step is to add a new field via setup > database fields. Next, click on the “add” button.
Adding a magic hidden field to your database
After clicking the “add” button, a window will open where you can add a database field. Note: it is important that you enter the exact name of the magic hidden field in the first text field (field name), e.g. “sender_name.” You can consult this article to see which names you can choose from. The text field marked “description” is less important and used to describe the nature of the database field. You are free to write anything you want there.
Setting up the data type and the input type
When you add a database field, you must also select a certain data type. This sounds complicated, but that is not the case at all. The data type determines the values that the field will use. A simple (and common) example is the distinction between text (string) and numbers (integer or big integer). We cover the available options in this article about data types. The choice of input type also seems more difficult than it really is. The input type determines how the database field can be filled out by a contact or you, the administrator. In the case of magic hidden fields, you do not have to select an input type. Nevertheless, if you want to know more about this topic, you can read this article on input types.
Working with the different types of magic hidden fields
The next step after creating a database field differs per magic hidden field type. There is no exact follow-up step for these (controllable) magic hidden fields:
- last_mail_date
- last_open_date
- last_click_date
These fields are automatically filled after an email has been sent. They record when an email was last sent to a contact, when they opened this email and when they clicked on anything.
The following (controllable) database fields do require a follow-up step:
- sender_name
- sender_email
- reply_name
- reply_email
These database fields have to be filled with the correct information. The four fields supersede the standard settings: the email address listed under sender_email will be the address used by the Webpower platform, as opposed to the sender address. This is not adjustable per email, it is campaign wide.
How to fill the database fields
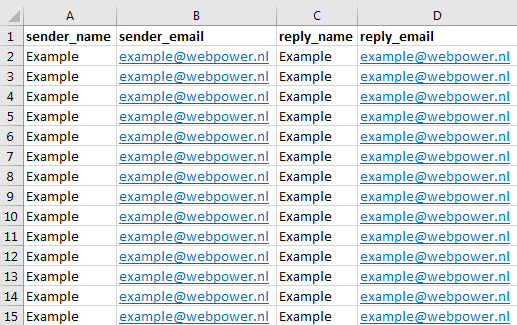
You can fill out the sender_name, sender_email, reply_name and reply_email database fields by creating them in Excel and then adding the right information. If the values differ per person, you will first have to export the group and add the database fields in Excel. Next, you can re-upload the CSV file to Webpower.

If the values are the same for everyone, it is not necessary to generate an export. In that case, it is enough to add the database fields and their respective values in Excel, as seen in the image above.
Importing the magic hidden fields
The final step is importing the generated Excel file as a CSV file in Webpower. You can do so via contacts > upload contacts.


 (No Ratings Yet)