Internet of Things: My first experience with Galileo 2 (part 1)
Published on MSDN Blog. Please, visit it for more great articles from Canadian DX team.
I didn’t feel so excited since that time, when I bought my first PC – ZX Spectrum. It was a new world, which required strong programming knowledge as well as ability to make research. And today I will open a door to one another new world, where I will try to integrate my programming knowledge with new types of hardware in order to build many new devices. Let’s begin.
First of all, in order to create a new hardware we need to buy some stuff like a board, sensors and wires. Because I have a good experience with Microsoft platform and Visual Studio, I have selected Intel Galileo 2 board, which is supported by Microsoft and it is compatible with Arduino boards, so you will able to find some stuff like sensors, shields, breadboards anywhere. At this time, I don’t have an idea about my future devices, so, I decided to buy a board as well as several starter kits. Finally, I bought my Galileo 2 board, SunFounder 37 modules Arduino Sensor Kit and Sunfounder Project Super Starter Kit.
I used Amazon in order to buy this stuff but you can use any online store. Additionally, I have visited Fry’s Electronics last week and I was too surprised that you may buy a board as well as many of these sensors and components there. There was a huge selection of kits for building own robots, sensors and wires. Probably, there is a special shop in Canada but I am a newcomer in Canada right now. So, please, recommend a good place here and it will help many Canadian developers.
Additionally, you will need a network cable, a microSD card (16 Gb should be enough) and microUSB to USB cable. The last one is used for all modern phones, so it should not be a problem but I forgot to buy a microSD, so I needed to find a nearest Staples in order to buy it. Pay special attention that in order to deploy your application, you need a network cable, which will connect your computer and your board.
Ok, right now, we have a board and some stuff, so we are ready to test the board. In order to use Windows as well as Visual Studio there, you will need to sign a special Windows Developer Program for IoT, which is available here: http://www.windowsondevices.com. You will need to use your Live ID, fill the registration form and right after your application is approved you will get access to Connect site, there you will be able to download all needed software.
In order to set up everything you will need three packages there: WIM image of the operation system, which you will deploy to your board (microSD card); apply-bootmedia.cmd file, which you will use to deploy the operation system; MSI package, which include some tools like Galileo Watcher and Visual Studio integration package.
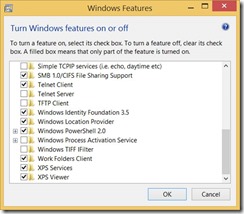
In order to setup your PC you will need to launch the MSI package and enable Telnet features there. Later we will use Telnet in order to kill processes and get some information from the board. In order to enable Telnet features just go to “Program and Features” in the “Control Panel” and call “Turn Windows Features on or off” window.
Right now it’s time to setup your board. In order to do it you need to deploy Windows image to microSD card. Apply-BootMedia.cmd is able to do it for you. Just run the following command in the Command Prompt window (with Administrator permissions):
apply-bootmedia.cmd -destination {YourSDCardDrive} -image {.wimFile} -hostname mygalileo -password admin
Your card will be ready in 2-3 minutes.
Right now, we are ready to run something on Galileo. So, put your microSD card to the slot on the board, use the network cable to connect your Galileo board and turn on your board. Pay attention that Intel provides a universal power supply unit with different connectors. So you will able to use your board anywhere despite of voltage of the local system.
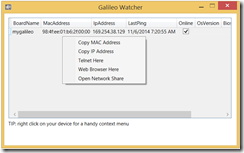
Usually it takes Galileo 2 2-3 minutes in order to start Windows there. During this process you will see blinking LED, which is marked as SD. When LED finishes blinking, your board is ready to communicate with your computer. The second way to understand that the board is ready – launch Galileo Watcher, which will show IP address of your board, MAC address, name and information about state of your board.
Using the Galileo Watcher you are able to monitor the state of your board as well as to launch some stuff like window in browser, which will show existing processes.
Pay attention that if you will use Visual Studio or Telnet in order to connect your board, you will need to provide the name and password there. We provided our password below and the default name is administrator. But, in many cases, you will need to provide the full name of the user like localhost\administrator or mygalileo\administrator, especially, if your computer is in a domain.
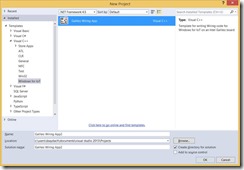
Finally, you may launch Visual Studio and create your first project for Galileo 2.
Microsoft provides a ready to go template, which we will discuss next time. Just try to start it on Galileo. If deployment is successful you will see that one more LED is blinking in infinity loop on your board.
In order to kill the process you will need to start Telnet and use the following commands:
· tlist – in order to see all existing processes
· kill <process ID> – in order to kill selected process
Probably I wrote enough for the first part. In the next article we will try to understand, what is Galileo and how to create a simple scenarios there.


S.B., please give any link of DIY-thinks (goods), for example, from you
Sergiy Baydachnyy
01/17/2015 at 5:46 PM
Hello to every single one, it’s genuinely a pleasant for me to go
to see this site, it contains priceless Information.
Short selling Your home
06/01/2016 at 7:39 PM