On November 13, I posted a photo on Instagram with the caption “It’s a great day for making baguettes.” This was before I found out about the attacks in Paris. When I heard the news, I was devastated and concerned about my Parisian friends, and I also felt a little bit awkward about my earlier post. I spent most of the afternoon thinking about the semester I lived in Paris, my chaotic petite famille de Port Royal, and the tiny appartment I shared with my two roommates and a cat. Our door was always open for friends and I have the fondest memories of the evenings we spent cooking, eating, laughing, making music, and just hanging out together. Our core group included people from Algeria, Austria, Brazil, Denmark, France, Germany, and the US, and we had the most amazing time together, regardless of our different cultural backgrounds or religious beliefs.
While I am deeply saddened by the events of November 13, my heart also leaps with joy at the outpouring of love from all over the world and the bravery, strength, and kindness that the people of Paris have shown. This is what I choose to remember and hold on to.
Paris will always hold a special place in my heart. It’s a city I have visited countless times and that I called home for six months; where I experienced amazing food, culture, and joie de vivre, and met the loveliest crazy bunch of people. It was a stop on the most epic road trip of my life so far, and it’s also the place where my husband proposed.
But without further ado, let’s talk about bread. I have been working on this post for a while now and I am very excited to share this recipe with you.
Now, if you think that making baguettes at home sounds daunting and complicated, let me assure you that it’s actually very simple. Shaping the loaves takes a little bit of practice, but you will still end up with a super delicious bread, even if it does look a little bit crooked on your first try. All the other steps are super easy.
As always with really good bread, all you need is a little bit of patience. And when I say patience, I really mean it. (Please don’t give up already, this recipe may take a long time from start to finish, but it’s actually very little work.) The dough for this recipe requires a long cold fermentation (48 hours at 42° to 45°F). Why can’t you just mix the dough and bake it immediately? Well, technically, you can. However, you would need a lot more yeast than specified in the formula below, the gluten would be less developed, and it simply wouldn’t taste as good. So, if you are in that much of a hurry, I’d recommend just going to a local bakery and picking up some French bread. If you are going to go through the effort of making it yourself, you might as well do it right.
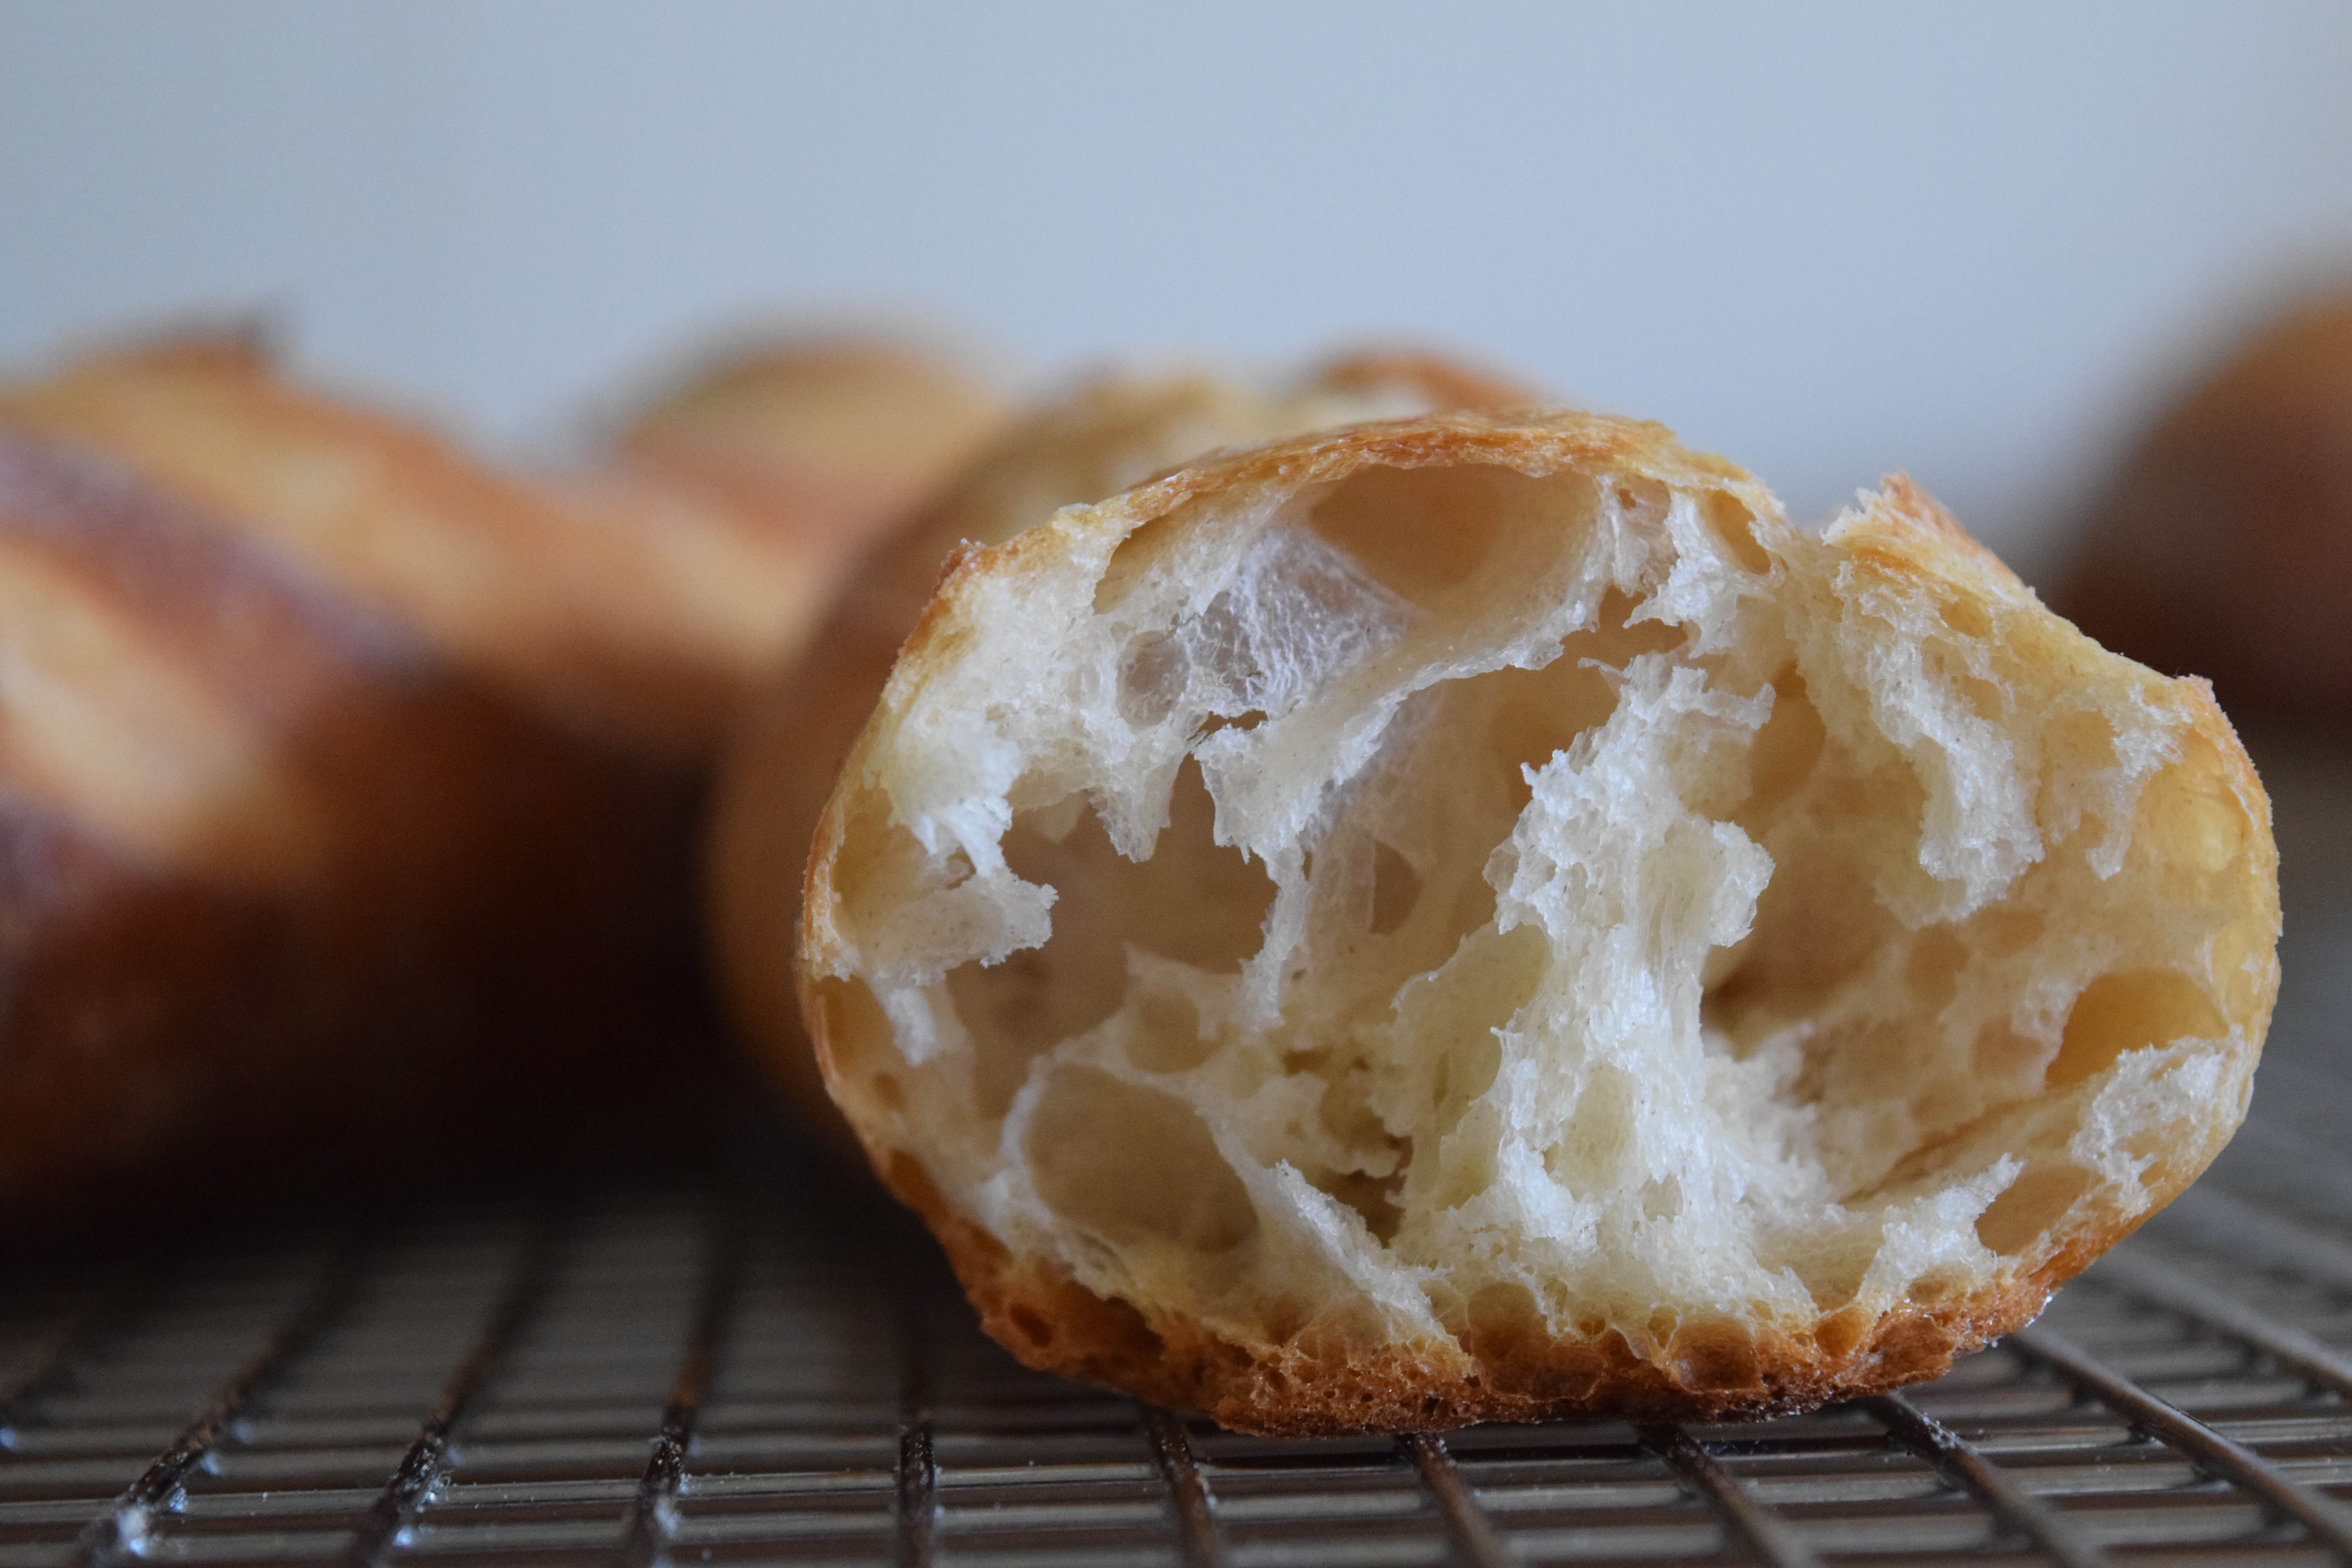
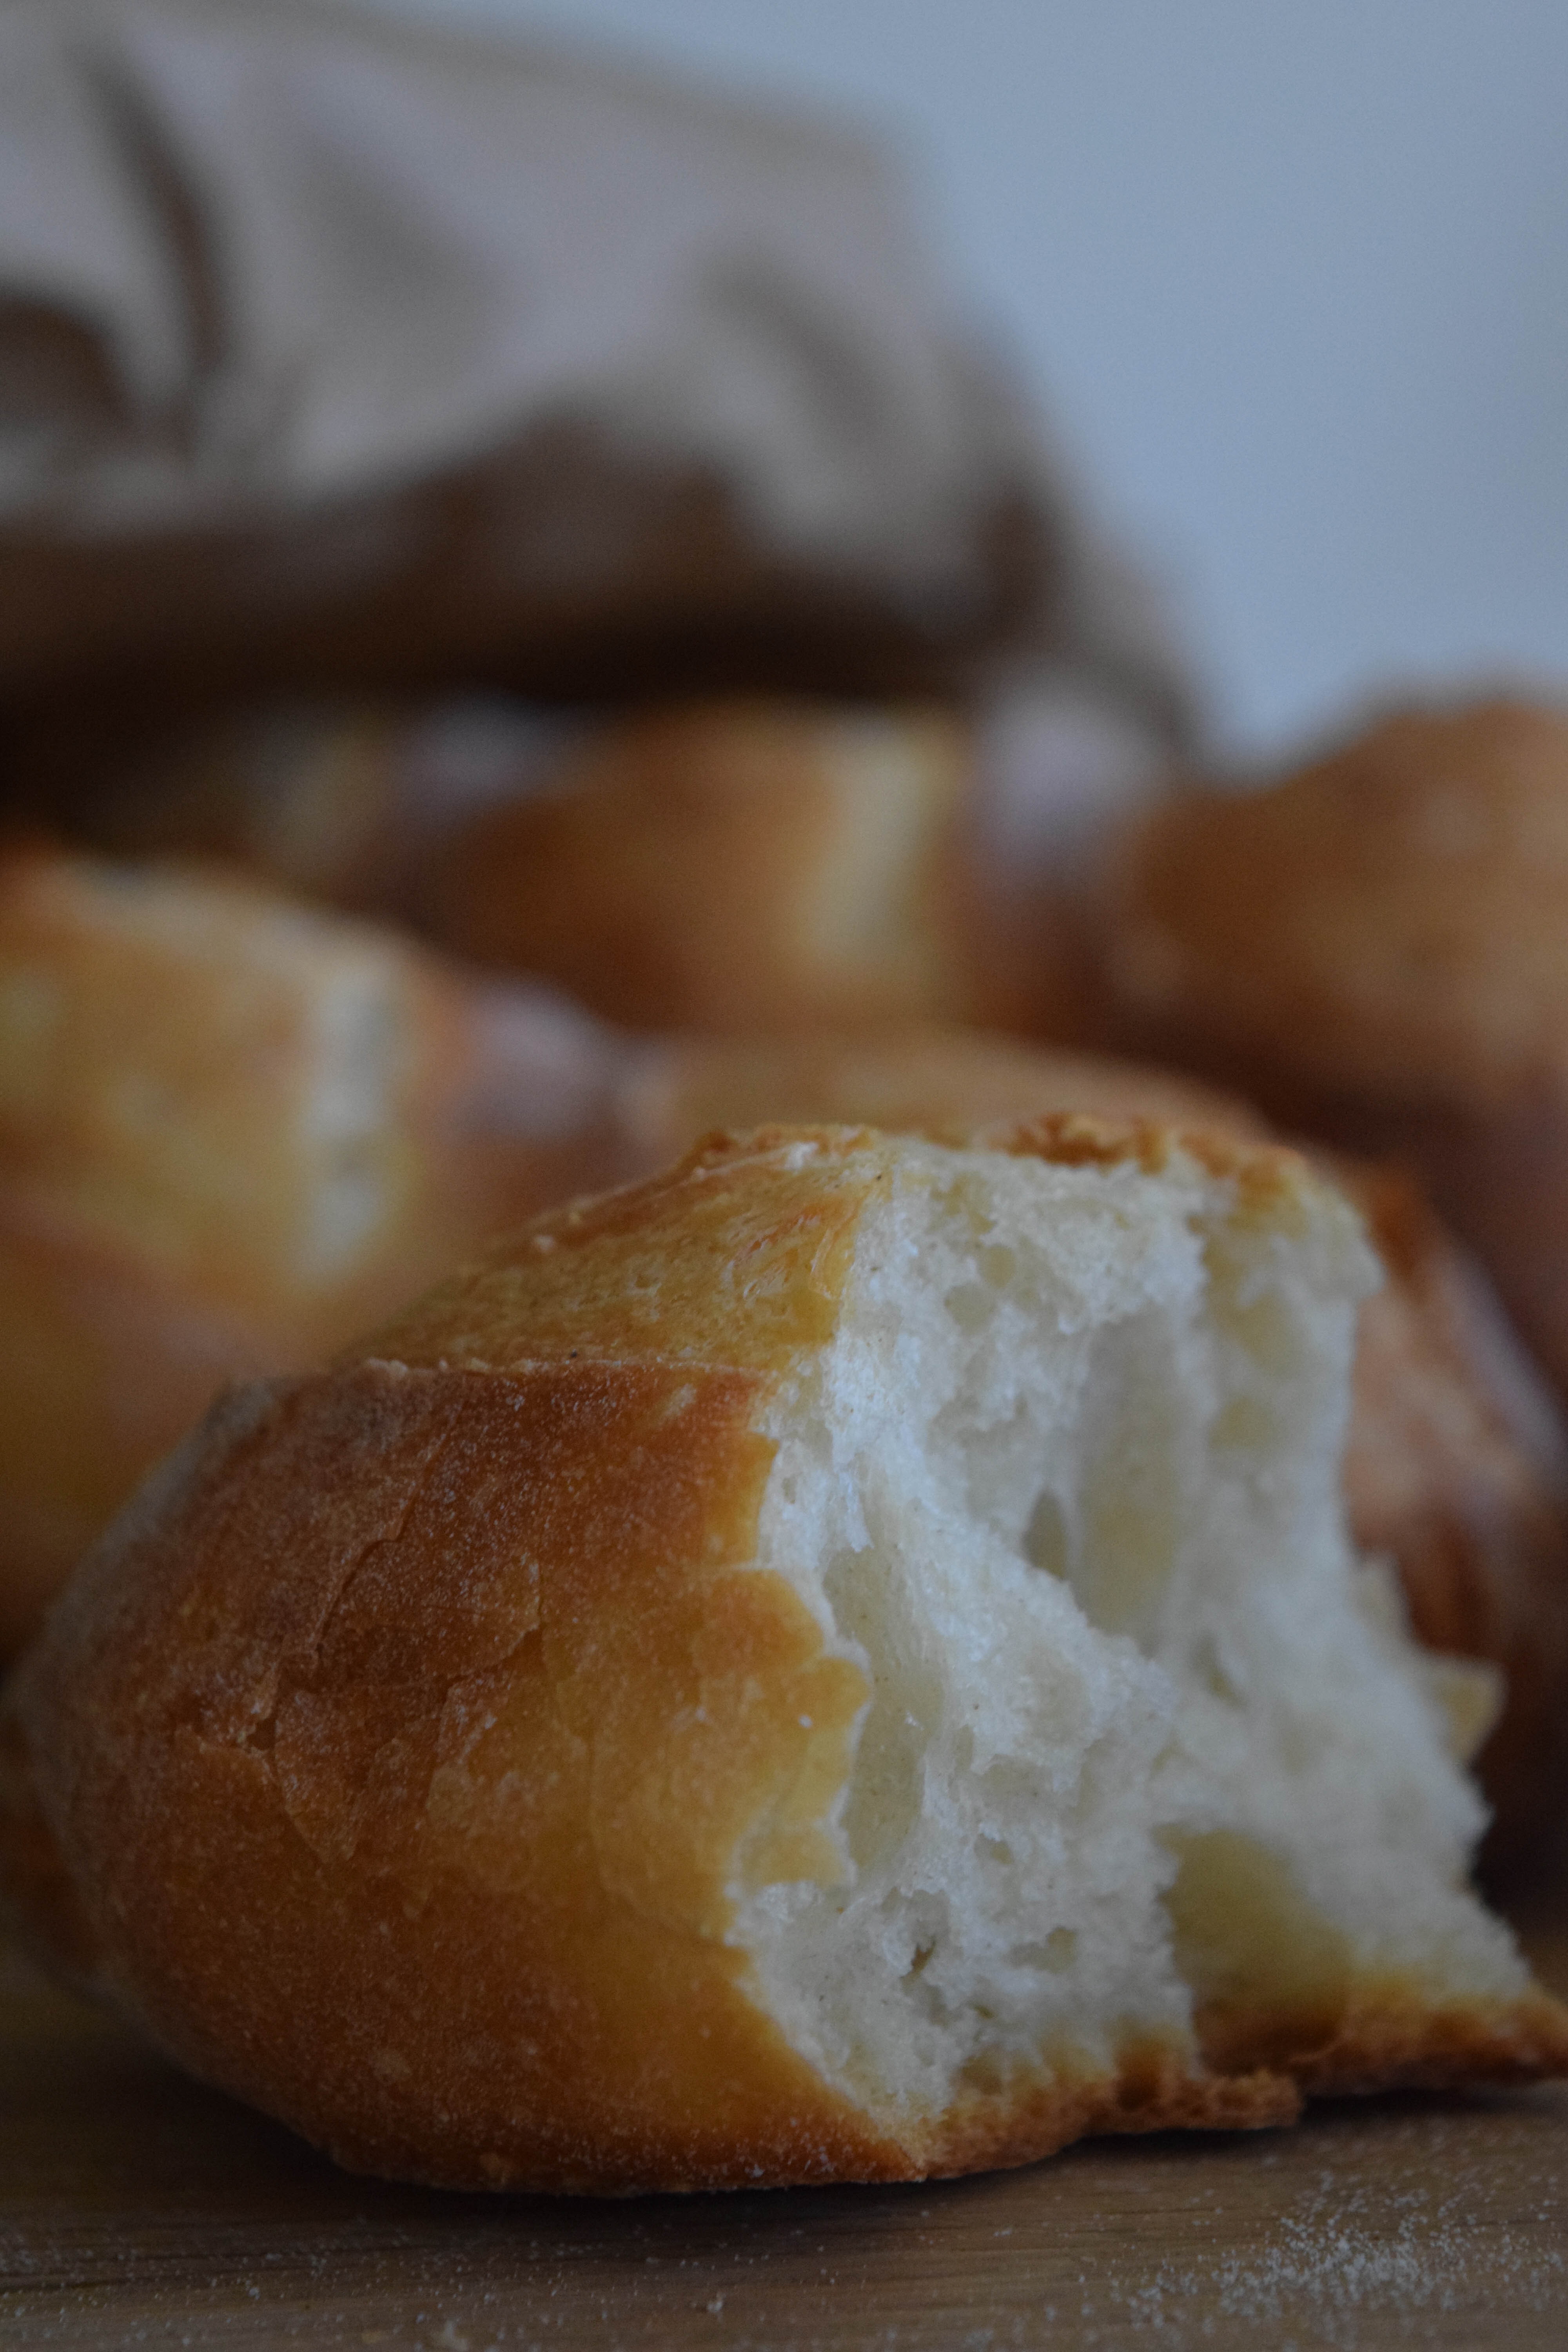
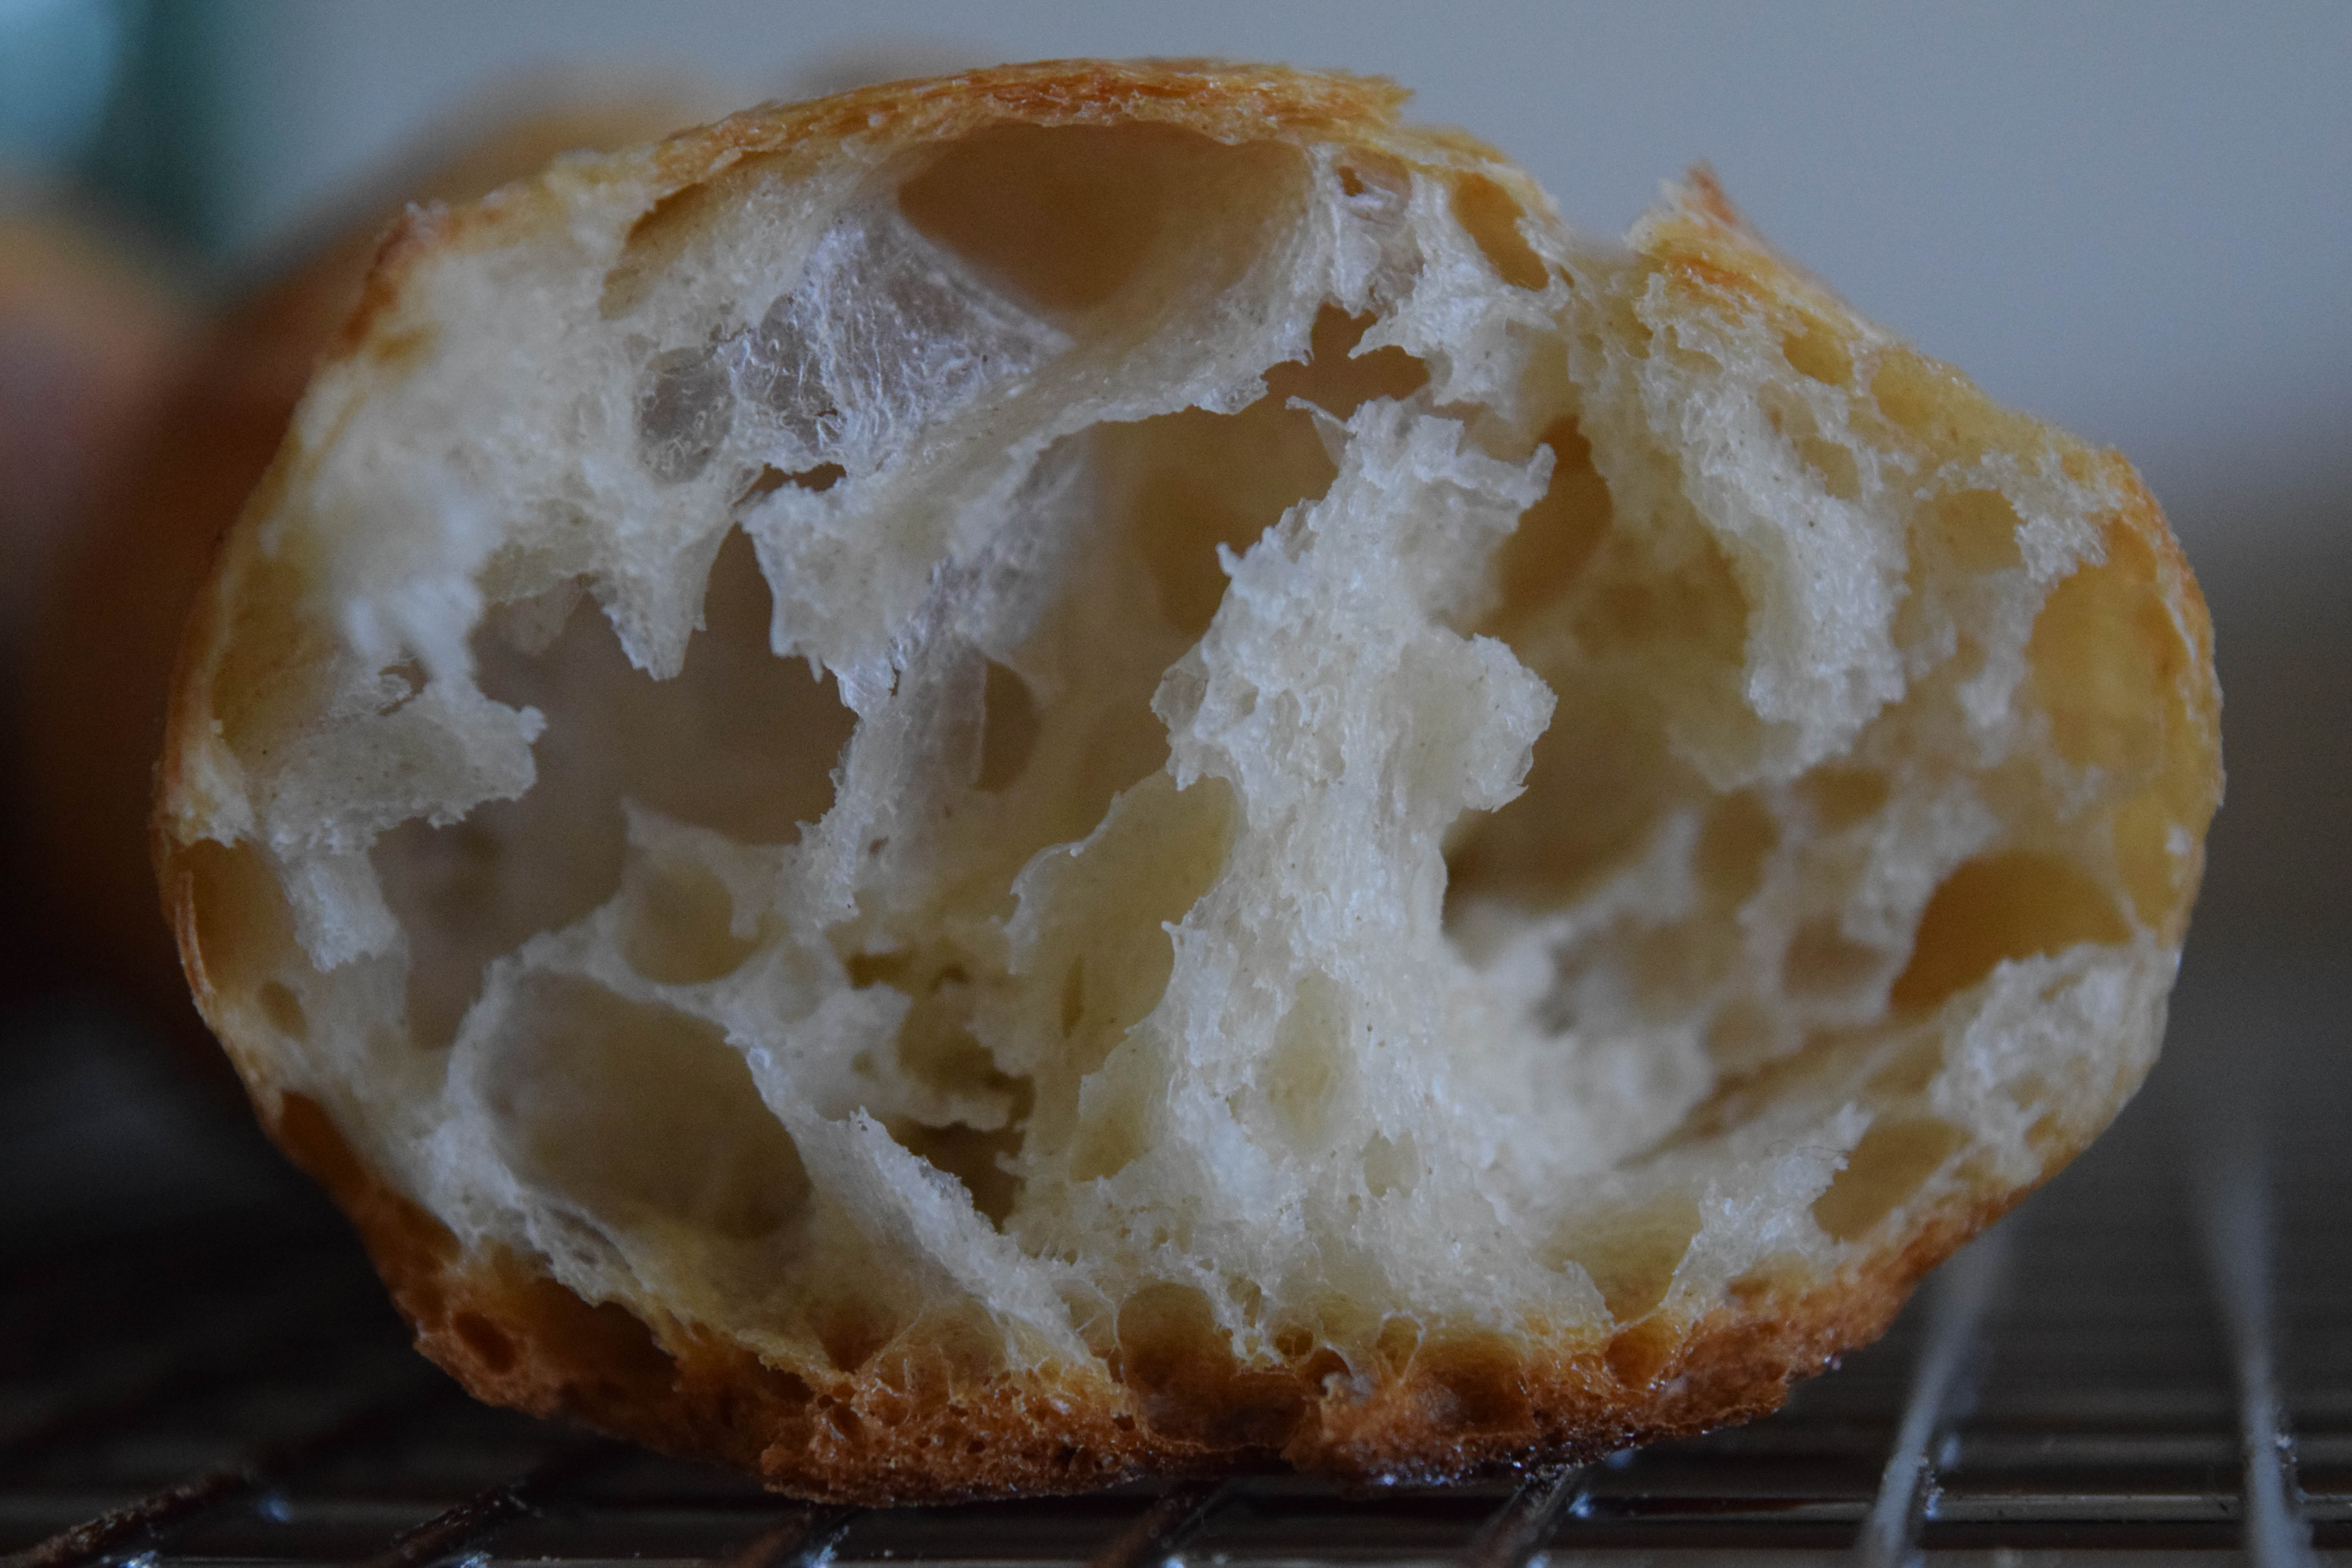
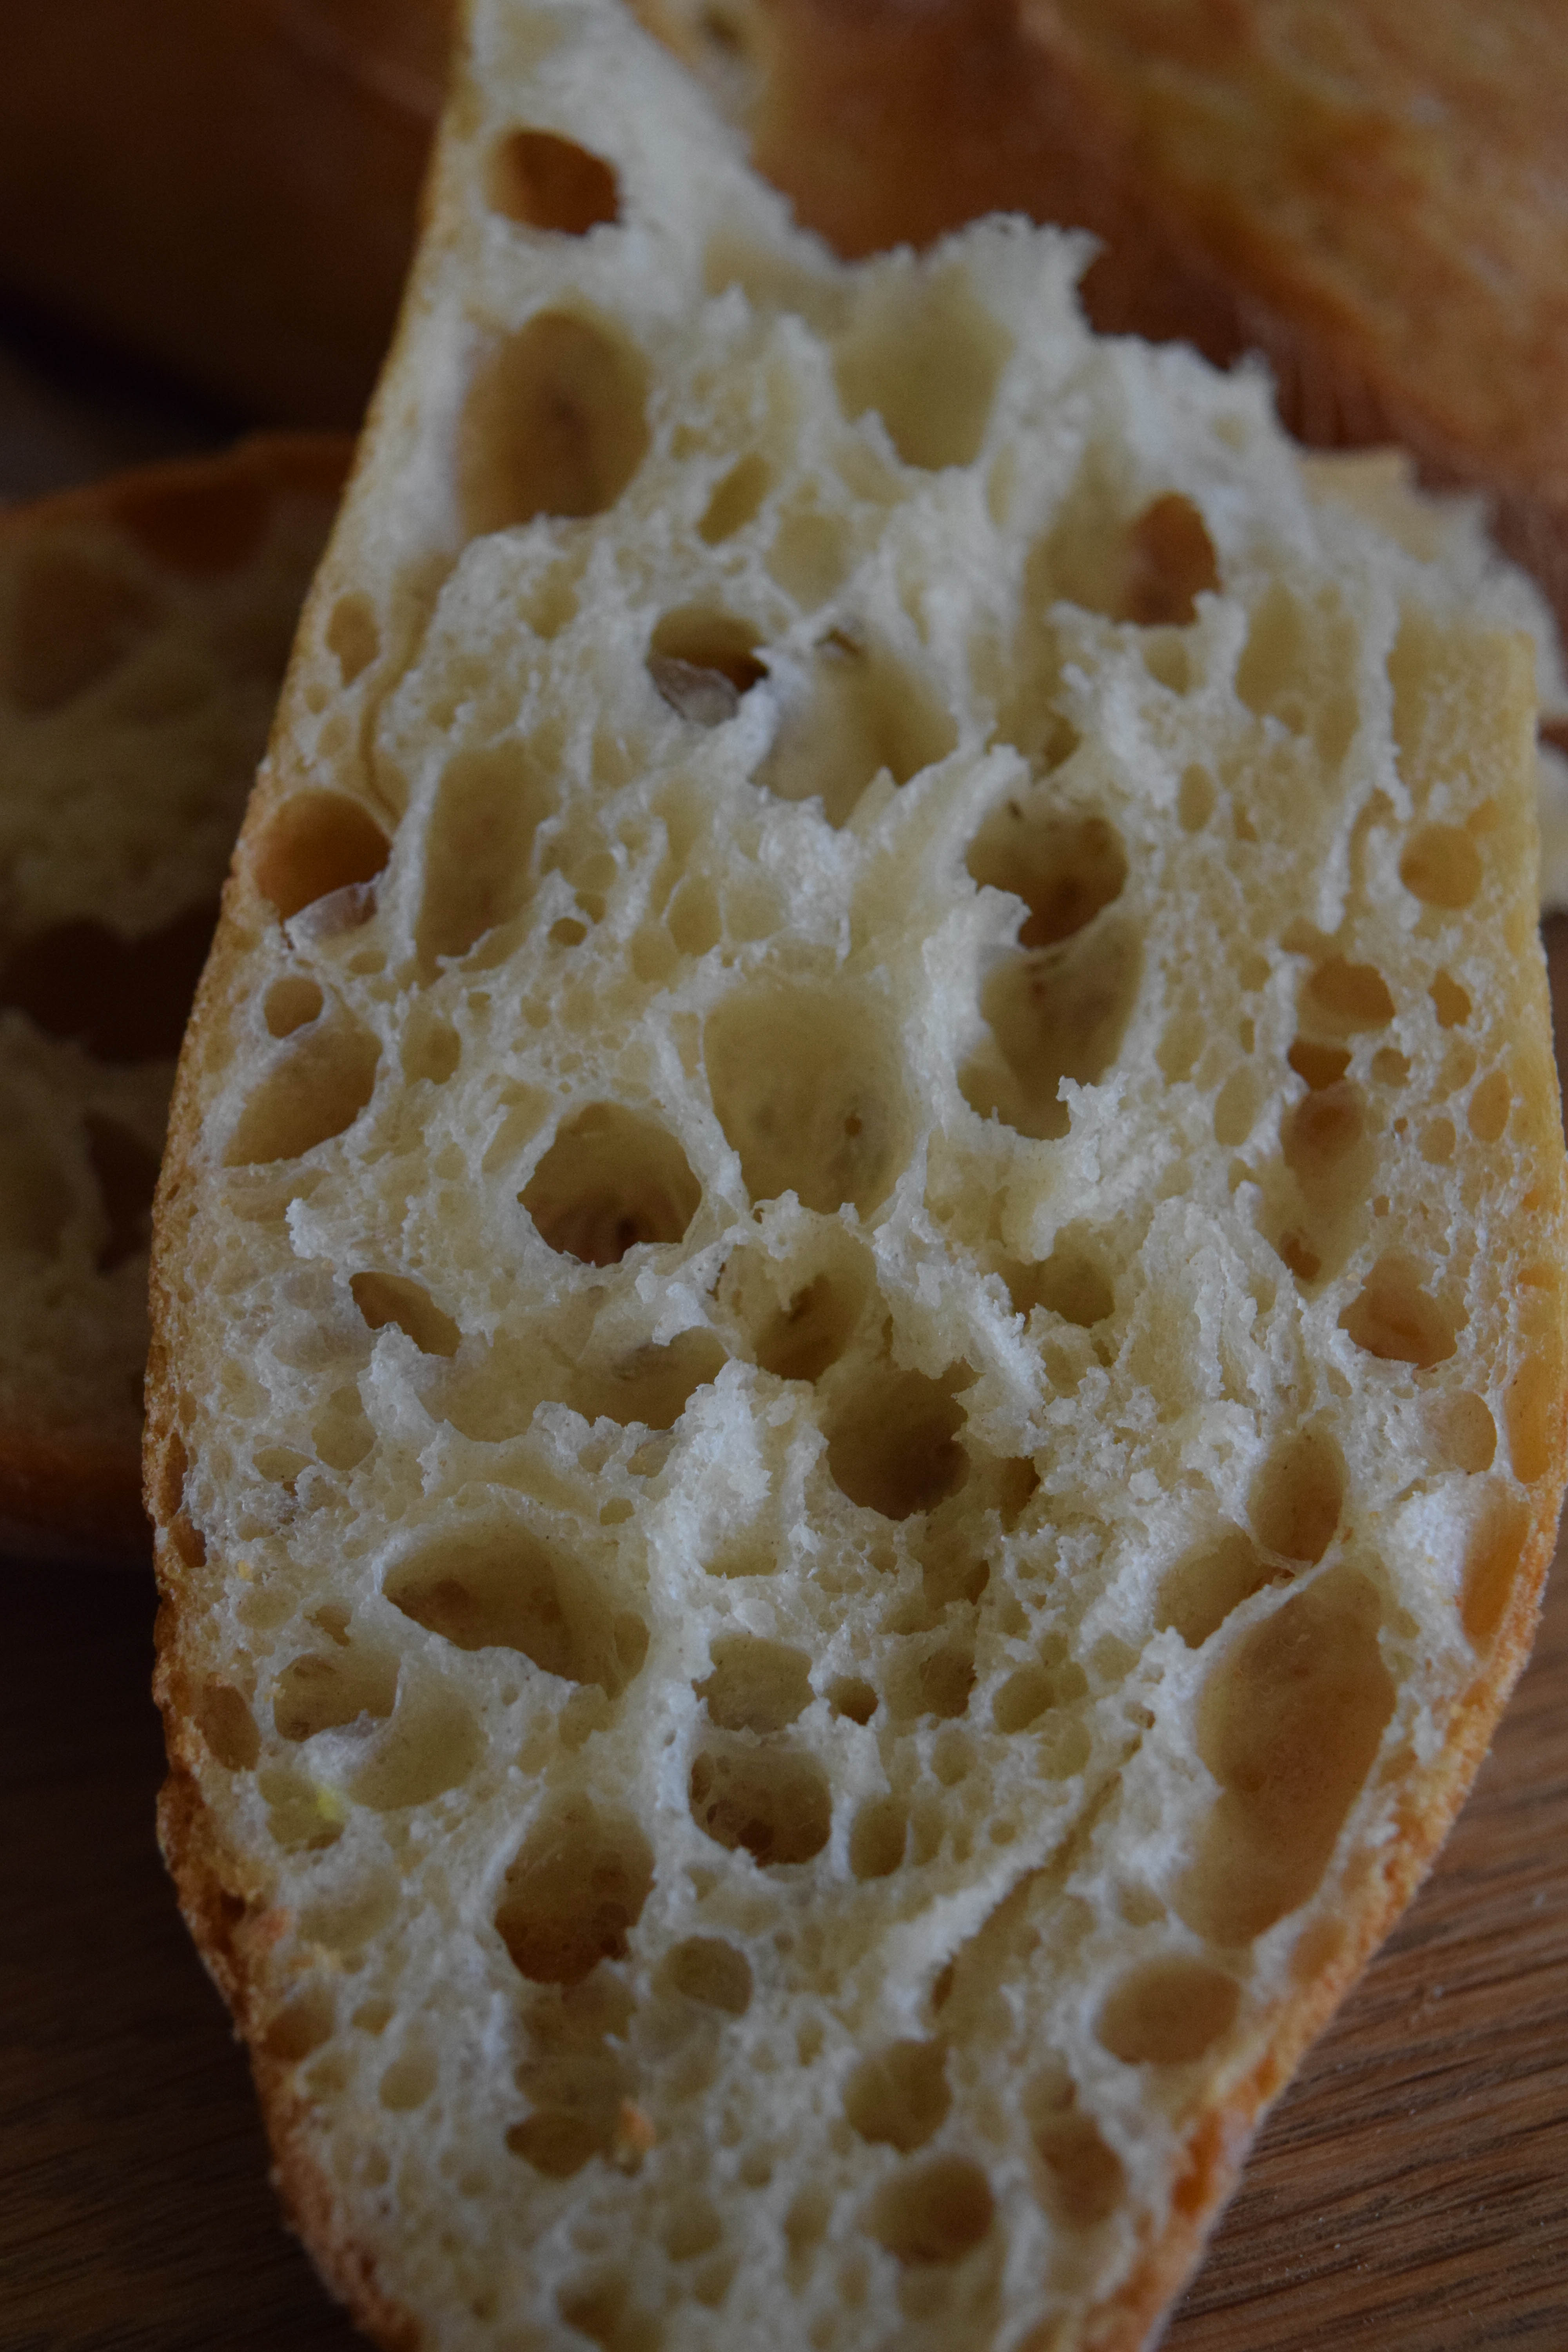
Let’s take a step back and look at the basics of fermentation in bread dough to understand what’s happening. Yeast is a living microorganism, classified as a member of the Fungi kingdom. Be nice to your yeast and it will be nice to you, it’s pretty awesome like that. Fermentation occurs when our little yeast buddies convert the fermentable sugars (the carbohydrates) in the dough into alcohol and carbon dioxide. While the yeast is doing its thing, the proteins in the dough link together to form a network of protein strands (gluten). As the yeast is digesting the carbohydrates, small carbon dioxide bubbles form around each microorganism. These gas bubbles make the dough rise and will create the “holes” in the baked bread, making it spongy and light. If the gluten is not developed (linked) well enough, it won’t be strong enough to contain the carbon dioxide bubbles, meaning the gas escapes and you’ll be left with a flat, decidedly less fluffy bread. The ethanol and other byproducts that are produced during the fermentation process have a large influence on the final flavor of the loaf. One important thing to keep in mind is that you don’t want the yeast to run out of food. This is why doughs made for long fermentation contain a lot less yeast than doughs with a shorter bulk fermentation, meaning you start out with less mouths to feed. Lower temperatures also slow down the growth and multiplication rate of the yeast, so it will take the yeast even longer to convert the sugar in our dough. So, long story short, slow and long fermentation makes for a stable gluten structure and complex flavors, as long as you make sure you are using the right amount of yeast. It’s all super fascinating, don’t you think?
So now that you know what is happening during fermentation, here are a couple of other helpful pointers for baking bread:
Maybe you already know to put a small dish with water into the oven when baking certain things, but have you ever wondered why? You probably already guessed that the steam that is created has a positive effect on your bread. But why? First of all, it prevents a crust from forming too early, which allows the loaf or bread rolls to expand as much as possible. Secondly, the steam changes the temperature of the crust during the first stages of baking, thereby altering how enzymes and starches react to the baking process. I don’t want to bore you with too much detail here, but in short, the steam makes sure that your bread will have a more golden, more glossy, and crunchier crust. So, more steam equals more volume and a better crust.
Professional bakers are able to saturate their fancy ovens with steam, which is why bread from a bakery looks so beautiful and, well, more professional. Most conventional home ovens are designed to vent as much as possible, and, unfortunately for us, they are doing a fabulous job.
However, there are a couple of tricks to improve the steam retention of your oven. I am still fighting with my own oven and am trying to come up with even more simple ways to create the most professional looking bread possible at home. My baguettes aren’t perfect yet, but these easy measures already make a huge difference:
- Try to cover any openings with moist towels. We have a pretty old gas stove that has a vent opening on top towards the back and lots of smaller venting holes in the front, right behind the bar on the oven door. It also vents through the openings of the burners on top. So when I am baking bread (and when I am not using a Dutch oven or my Römertopf clay baker), I stuff a large towel behind the bar of the door, fold a smaller towel and place it on the vent opening in the back, and cover the entire top with another large towel. Dry towels will do a decent job, too, but if you moisten them beforehand, they will hold in even more steam. Just be careful when you remove them later, as they can get quite hot.
- Place a large metal baking sheet in the bottom of the oven when you are preheating. As soon as you have put your bread into the oven, quickly pour water on the baking sheet. Mind the hot steam that will start rising up immediately. The safest way is to just pour the water into one corner of the baking sheet. It will spread on its own. Make sure that you don’t use more water than your baking sheet can hold. In most cases, one cup should be plenty. Immediately shut the oven door to make sure the steam can’t escape.
– Why is this better than putting a ceramic dish with water into the oven while preheating or baking? The baking sheet is made of metal, which can transfer heat extremely well. Since you have preheated it in the oven, it is nice and hot, and ready to evaporate water very quickly. It also has a large surface area, which means that it can create a lot more steam at once.
Ok, I think we are ready to get going now. The recipe below has been slightly adapted from the original recipe by one of my personal bread gurus, Lutz Geißler, who runs the amazing German bread baking blog Ploetzblog. Now again, before you start, remember that this dough needs to rest in the refridgerator for 48 hours, so try to keep that in mind when you are mixing it – around what time do you want to bake the baguettes two days from now? I apologize in advance for including so many pictures, but I wanted to make sure that all the steps for shaping the baguettes are as clear as possible. I will see if I can get around to posting a video some time soon.
Time required on the day of mixing the dough: 1 hour 10 minutes. Time required on the day you bake: 1 hour 15 minutes.
Here’s what you’ll need (makes three foot-long baguettes):
Equipment:
- bench knife or plastic dough scraper (not an absolute must, but extremely helpful)
- baker’s couche or a large clean dish towel
- towels to cover any oven vents
- baking stone or an oven rack and baking sheet
- large baking sheet (to create the steam)
- parchment paper
- a razor blade or really sharp knife
For the dough:
- 360 g (12.69 ounces) bread flour [all purpose flour will work, but bread flour contains more gluten]
- 260 g (9.2 ounces) water
- 2 g (about 3/4 teaspoon) active dry yeast
- 7 g (about 1 teaspoon) salt
- 2 g (about 1/2 teaspoon) sugar

- Using your hands, combine all ingredients for the dough until you see no more bits of dry flour.

- Cover with plastic wrap or a clean kitchen towel and let the dough rest at room temperature for 1 hour, stretching and folding it every 20 minutes.
- For the stretch and fold: dip your hand in water to prevent the dough from sticking to it. On the side of the bowl, slide your hand under the dough. Now pull about half of the dough upward, stretch it, fold it over the rest of the dough, and tuck the end in on the other side of the bowl. This helps add oxygen to the dough, develops the gluten, and balances the temperature in the dough. Repeat two more times at 20 minute intervals, rotating the bowl 90° each time to make sure all parts of the dough get stretched.


- Tightly cover the bowl with plastic wrap and transfer it to the fridge for bulk fermentation. Make sure you put it in a warmer section of your fridge. The front of the top shelf is a good spot. It’s a good idea to put a sticky note on it with the date and rough time you want to bake the baguettes. Forget about it for 48 hours.
- On the day you want to bake: Place a large metal baking sheet in the bottom of the oven. Preheat oven to 480°F. Lightly flour one surface of a large kitchen towel or a baker’s couche.
- Remove the dough from the fridge and transfer it to a lightly floured counter top. Using a bench knife or plastic dough scraper, divide the dough into three equal portions.

- Pre-shape the cylinders, working one dough piece at a time. To pre-shape, gently shape the dough into a rectangle, without degassing it. You can see above that I ended up with two pretty rectangular pieces and one that was more triangular, so the triangle was the only one that needed a little coaxing during this stage.

- Very gently roll the rectangle into a short, thick cylinder without using any pressure.


- Transfer the cylinders to the floured kitchen towel or couche, pulling up the fabric between them to create a barrier. Fold the rest of the fabric over the dough to cover it (not shown). Let rest at room temperature for 15 minutes.

- Again, working one piece of dough at a time, transfer the cylinders back to a lightly floured counter top.

- Using your fingertips, deflate the dough and shape it into a flat rectangle. The more even the rectangle, the more even the thickness of your finished baguettes will be.

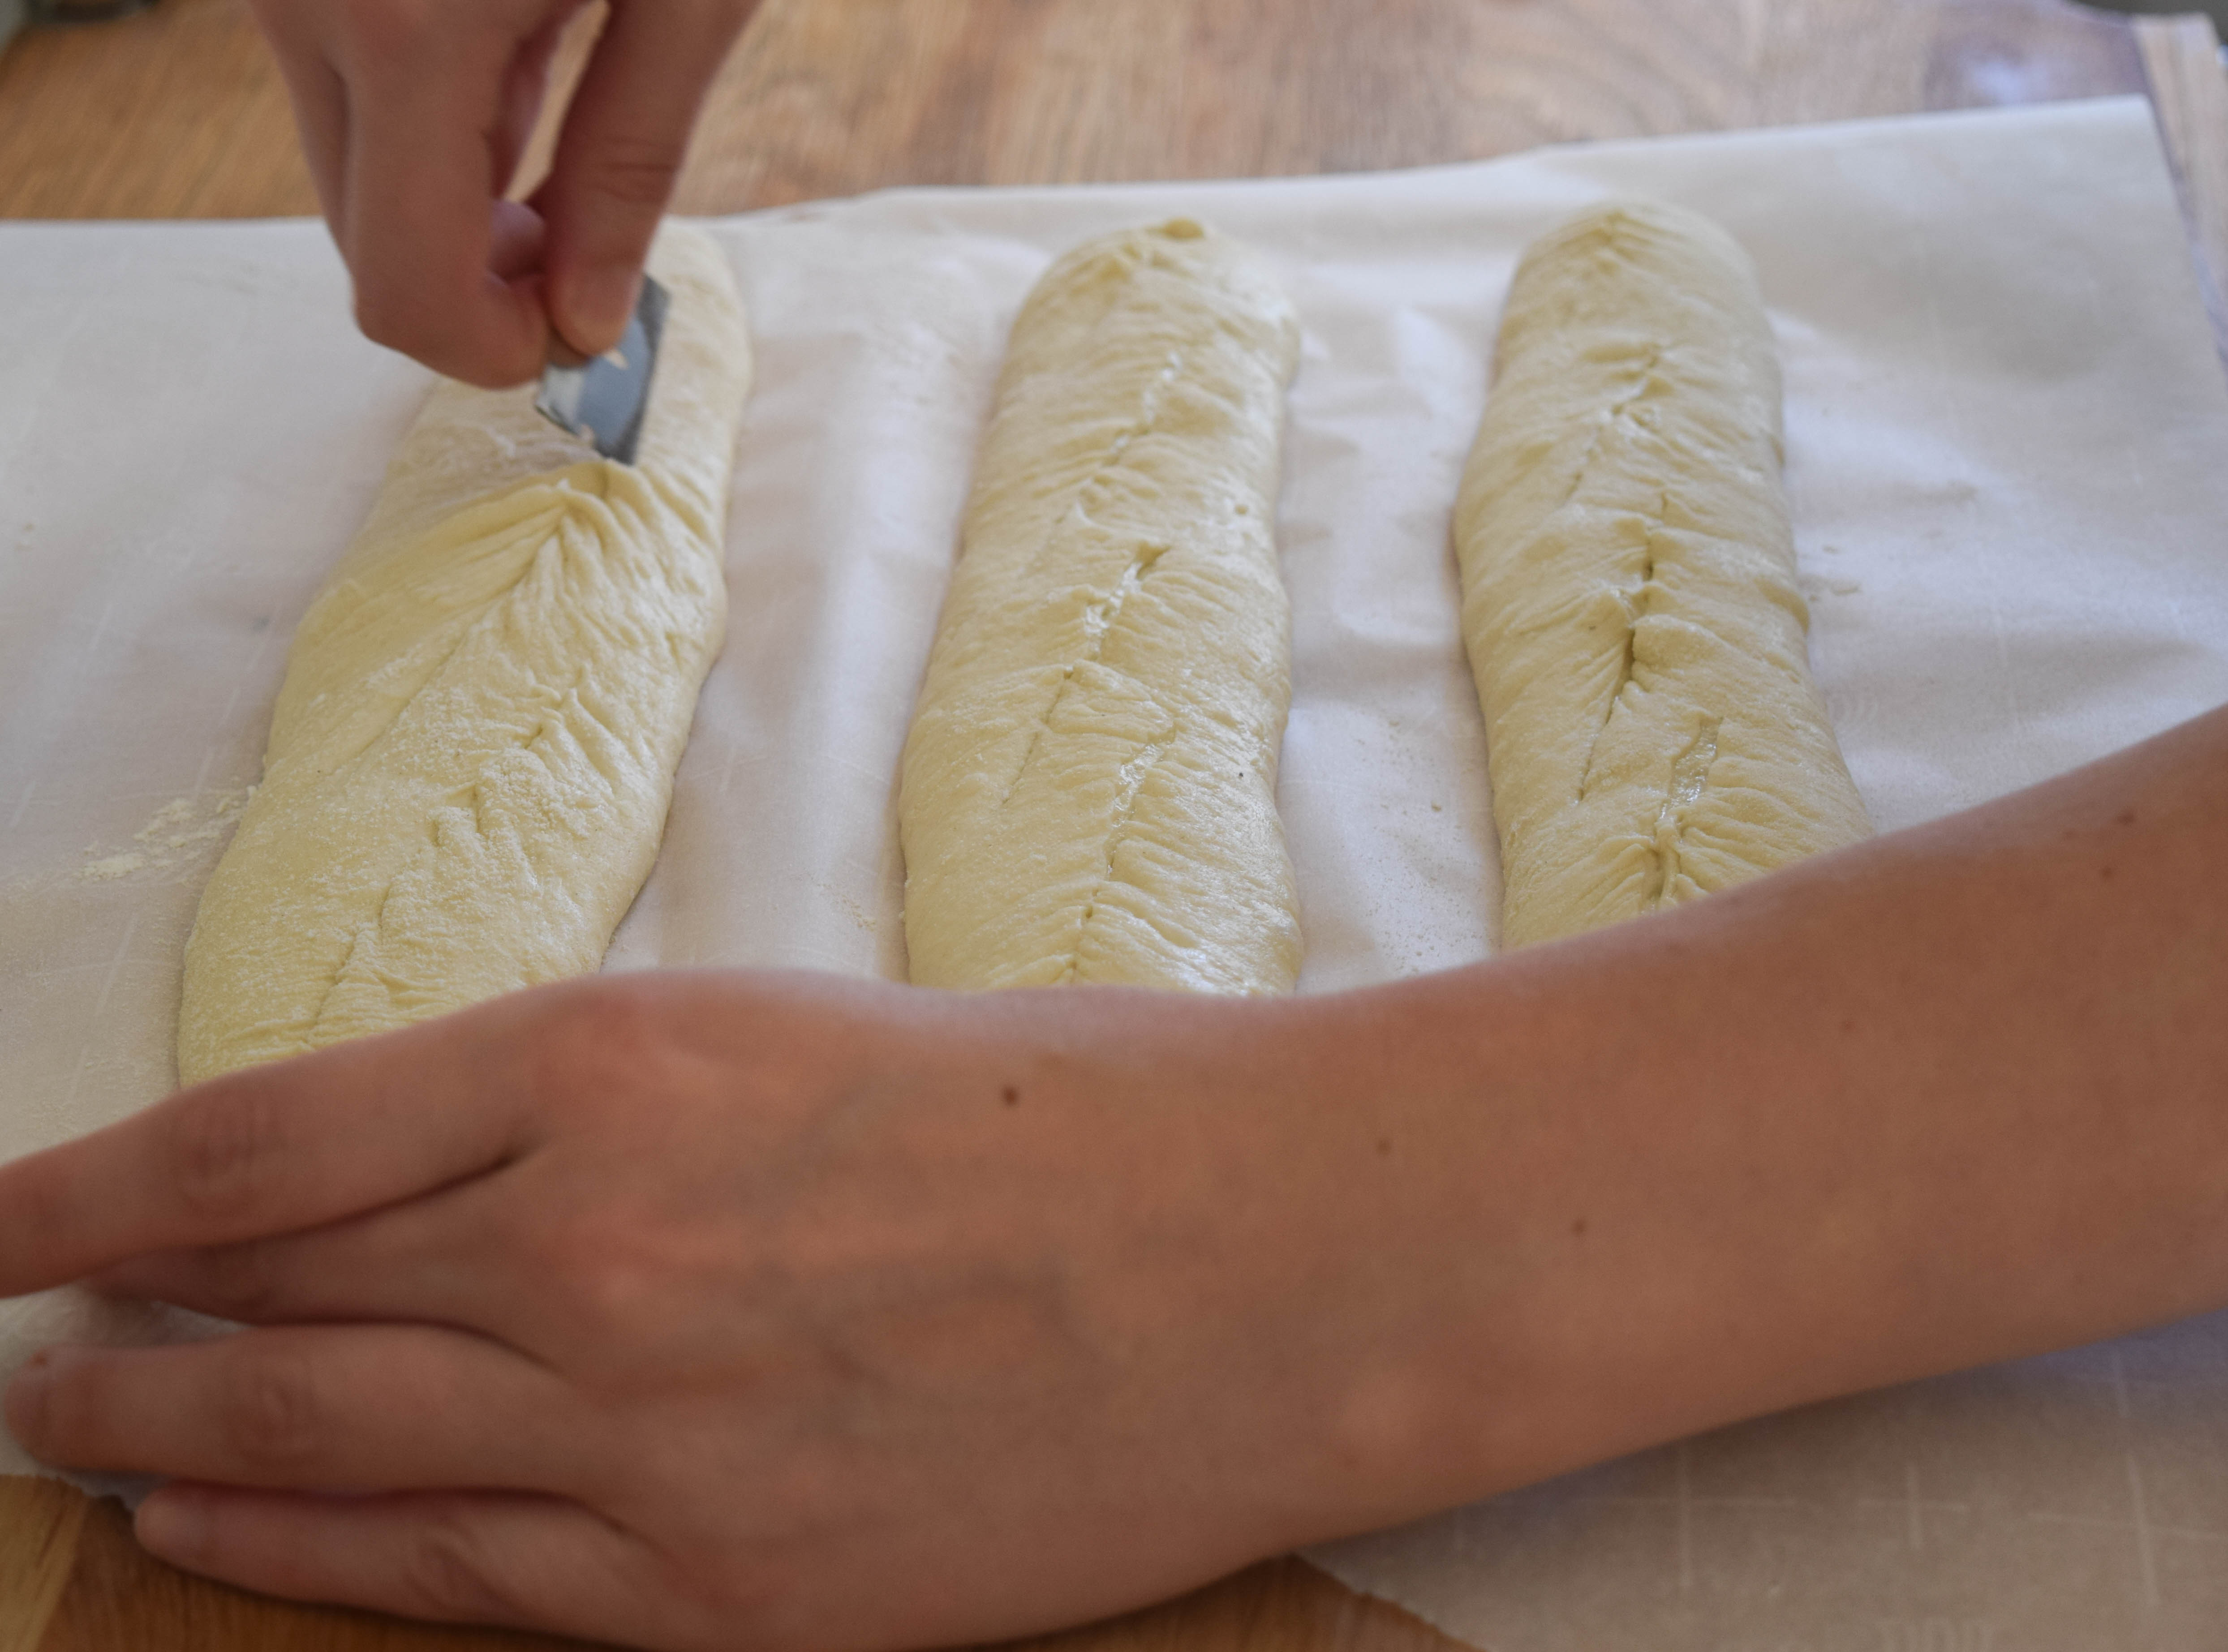
- Make sure the dough is not sticking to the surface. It’s time to shape the baguettes and this process can be a little bit tricky at first. Take the edge of the dough that is facing away from you and fold it towards you about 2/3 of the total length of the rectangle. Using your fingertips, press the edge into the dough to create a sausage-like shape.

- Repeat this step again, leaving a short lip at the edge closest to you. You are trying to create tension on the underside of the dough, which will later be the outside of your baguette.

- Turn the dough 180° so the lip is facing away from you.

- Tap the heel of your right hand (if you are right-handed) on some flour to prevent it from sticking to the dough. Now stretch the lip over the roll structure and quickly press the edge down using the floured heel of your right hand. Work your way along the cylinder until the entire lip has been folded over. Think of your hand as a stapler to staple together the edges and close the seam.

- Repeat this step one more time. This time you won’t have a lip to fold over, but instead you’ll almost fold the roll in half. If you find this step too tricky, you can skip it the first couple of times you make baguettes until you feel more comfortable handling the dough.

- Now it’s time to roll and stretch the baguette. Start with your palms facing each other and the bases of your pinkies resting on the middle of the baguette.

- Start flattening out your hands while rolling the dough back and forth and increasing the distance between your hands so you are simultaneously rolling and stretching the dough.

- Repeat two more times. When you reach the ends, you can either stop and leave them round or you can continue rolling with pressure to make them pointy.

- Locate the seam where you “stapled” the dough together during the shaping.

- Carefully transfer the baguettes to a baking sheet lined with parchment paper, the seam should be on the bottom.
- Cover with the floured kitchen towel or baker’s couche. Let rest at warm room temperature for 30 minutes.
- Fill a cup with water, cover open vents on your oven with moist towels.
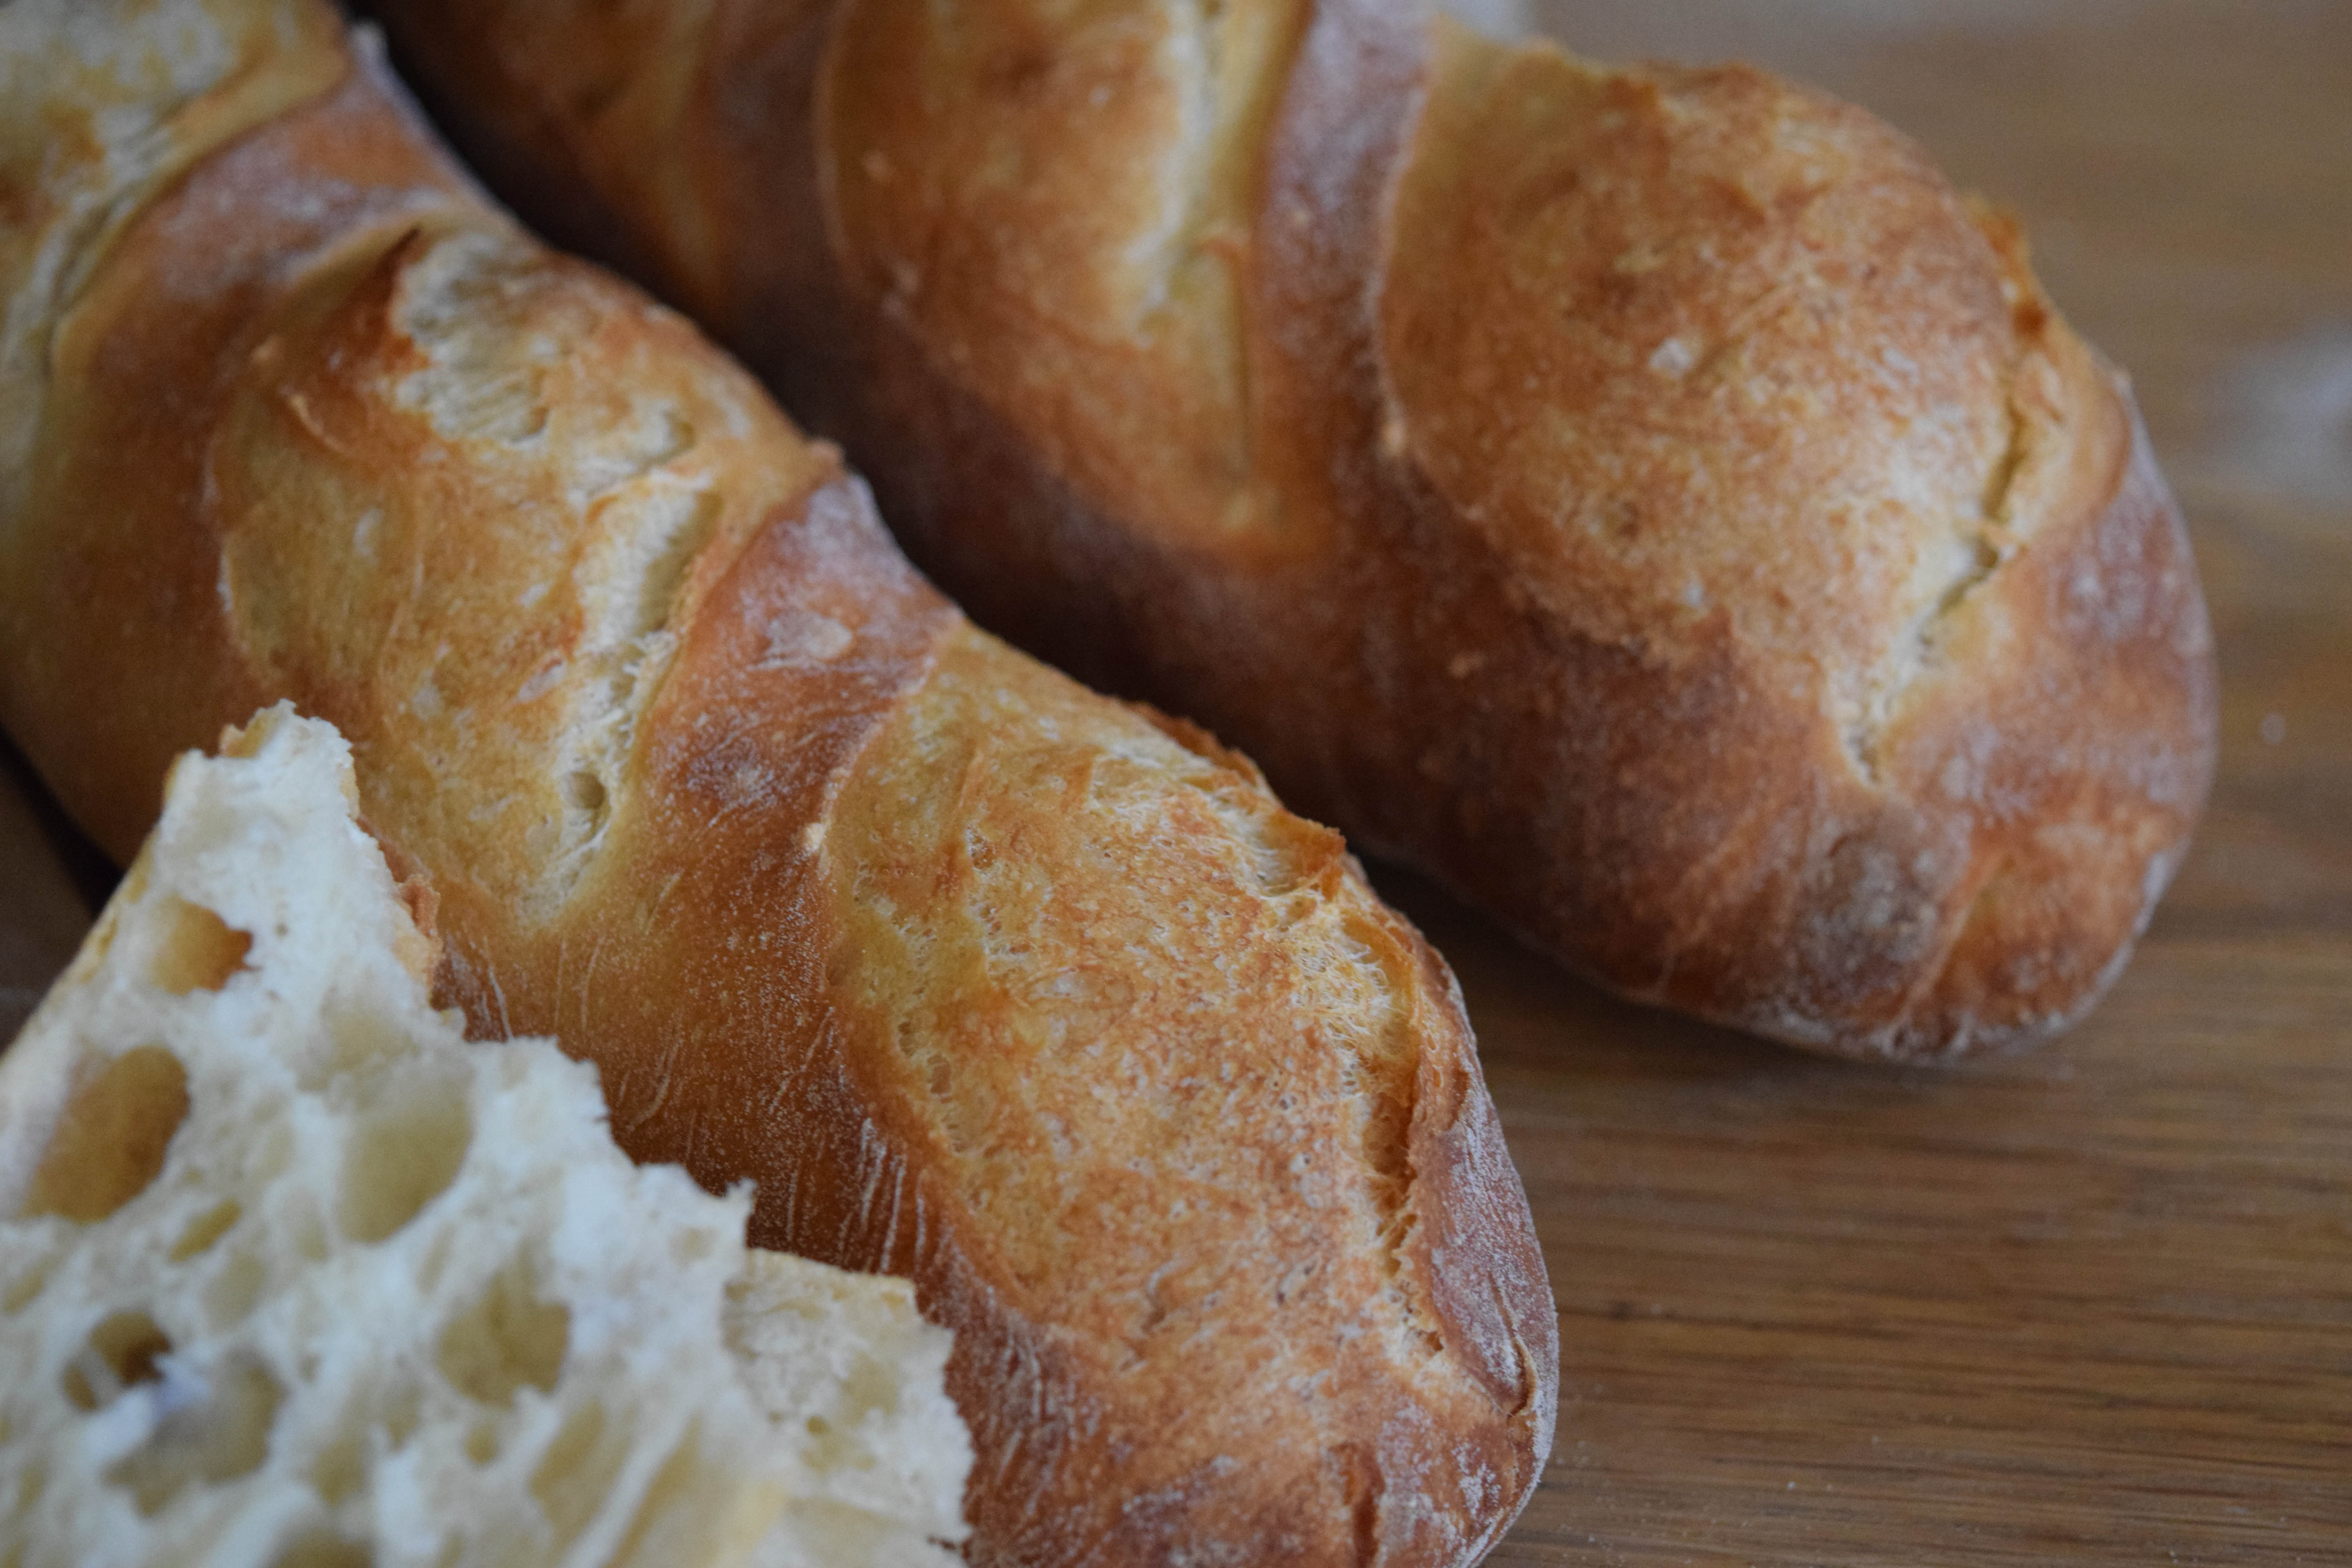
- Using the razor blade, quickly score the top of each baguette three to four times. The dough is pretty sticky, so your cuts have to be decisive and fast, or you will end up pulling on the dough too much and deflating it.

- Each score (cut) should be about 1 cm deep, slightly offset from the longitudinal axis of the baguette (10-20°) and they should overlap by up to a third of their length.

- Transfer the baguettes to the baking stone or an oven rack on the middle level and use the cup to quickly pour water on the second baking sheet that has been preheating at the bottom of the oven. Immediately close the oven door and lower the temperature to 450°F. Bake until the crust is a deep golden brown and the baguettes sound hollow when you knock on the bottom, about 20-25 minutes.
- Transfer to a cooling rack.

Enjoy!
Homemade Baguettes
Ingredients:
- 360 g (12.69 ounces) bread flour
- 260 g (9.2 ounces) water
- 2 g (about 3/4 teaspoon) active dry yeast
- 7 g (about 1 teaspoon) salt
- 2 g (about 1/2 teaspoon) sugar
- Using your hands, combine all ingredients for the dough until you see no more bits of dry flour.
- Cover and let the dough rest at room temperature for 1 hour, stretching and folding it every 20 minutes.
- Tightly cover the bowl with plastic wrap and transfer it to the fridge for 48 hours of bulk fermentation.
- On baking day: Preheat oven to 480°F.
- Divide dough into three equal portions. Preshape the baguettes.
- Transfer to a floured baker’s couche and let rest at room temperature for 15 minutes.
- Shape the baguettes and transfer to baking sheet lined with parchment paper. Cover with baker’s couche and let rest at room temperature for 30 minutes.
- Transfer baguettes to the oven, saturate oven with steam. Lower temperature to 450°F.
- Bake until golden brown, about 20-25 minutes.
- Transfer to a cooling rack and let cool completely.
Enjoy!


Looks like quite a bit of work, the end results are beautiful! I hope your friends are all safe in Paris. I was pretty shocked since I have a few friends living or touring there at the time.
LikeLiked by 1 person
Thanks, Cher. Yes, everybody is safe. I hope the same is true for your friends. The recipe looks more complicated than it is. I just wanted to make sure all the steps are clear. If you have made it a couple of times, it takes only a minute to shape each baguette.
LikeLiked by 1 person
Hahaa I will definitely give it a try! I’ve been on a baking spree lately and I can’t wait to try out new kinds of bread!
LikeLiked by 1 person
Wow! Such beautiful looking baguettes. 🙂
LikeLiked by 1 person
Thanks, Jhuls!
LikeLike