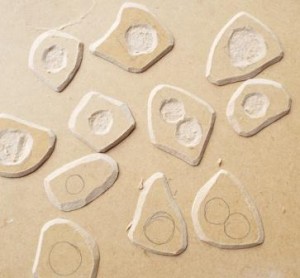
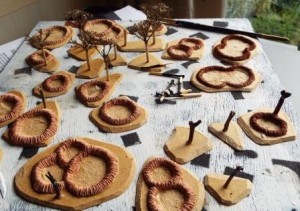
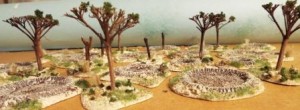
Following on from the savannah trees, I thought I would put together some pieces to represent the aftermath of a bombardment. I have constructed some craters, some tree stumps and some trees which have had most of the foliage stripped by fire or blast.
Figured most of the fighting would probably be in the dry season, so decided not to put water in the shell holes, but it would easily be done with varnish or resin and would look good. Before the artillery buffs tell me the shell holes are too big for the ordnance in use – I deliberately made some of them bigger so that I could put a unit base in them as I reckon that a dry shell-hole would make pretty good cover.
As for the bases. As per usual, they are 3mm mdf with a chamfered edge.
Firstly I drew a circle on those that were to have shell craters on them. They allowed space around them on the base to take the rim of earth thrown up by the blast. I then used a craft knife to cut around the circle, making sure not to go all the way through, then prised out the leaving around 1mm depth mdf across bottom of the shell-hole. This was just to give the hole a bit more depth.
The rim is then made with air-drying modelling clay. Roll a thin sausage of the clay to a length equal to the outside of the crater. This won’t stick to the mdf, so I put a layer of white glue on the mdf and applied the clay sausage to that with a roughly triangular profile.
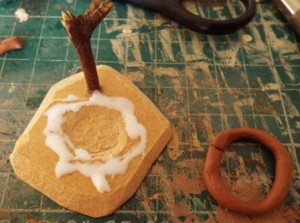

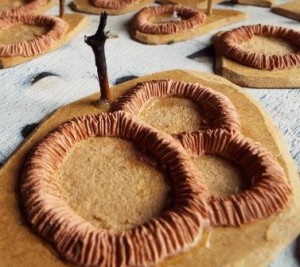
I then used the blunt side of a craft blade to create radiating ridges in the rim – not really sure why but I though as the blast drove earth and stones outward it would most likely create that effect. Should have looked at pictures really, but I’m reasonably happy with it. Inside first, then outside, then top to round it a bit. It’s quick – doesn’t need to be neat. For this one I deliberately had the gap in the middle to take a figure base. In the shots below there are multi-crater pieces where I have tried to make it appear that craters have overlapped and the latest shell has disrupted the rim of the earlier craters where they have overlapped.
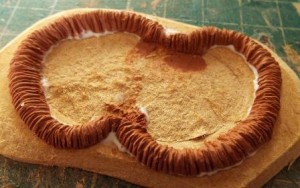
Allowed the clay to dry.
Next I put the trees and stumps in place, as per the method in the Savannah Trees article. When they had dried, out with the matches. In the dry weather I figured that fires would readily catch, so I wanted a blackened and burnt effect on some of them. I carefully applied lit matches to get the effect I wanted. Tip 1 – have a little water put by to stop the twigs from continuing to burn after the match is removed. Tip 2 – burn the twigs rather than yourself. Tip 3 – don’t forget tip 2 30 seconds after first recognising the need for it.
Anyway, next job is to paint the twigs with watered down dark brown paint for a consistent colour. Don’t paint the burnt bits – you want them black.
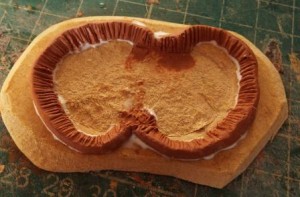
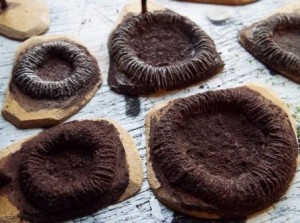
Now to the base. I first tried just using the sand colour across the base, but the craters didn’t stand out enough for me, so I opted for a dark brown. This is on the probably rubbish basis that the soil below the surface would be darker. I worked in a small amount of playpit sand for texture.
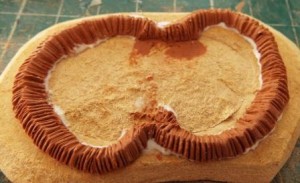
When that is dry, dry-brush with the sand-coloured paint. Here is a picture with the brown at the front and the first dry brush at the back. I dry-brushed them further after the picture.
Next job is the rest of the base. Sand-coloured smooth masonry paint with some playpit sand for texture, then tufts of hemp for long dry grass, small pieces of smashed sandstone, a few clumps of static grass and some flock. The long tufts were placed so that looked as if the blast had pushed it back. For bases where there are trees with branches remaining, I applied a few tiny clumps of the clump flock to a few of the branches with white glue to represent a few leaves not blasted off, and a few small clumps on the ground around the tree.
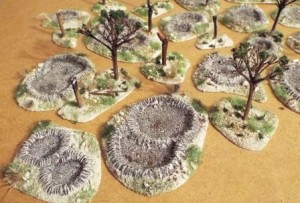
Final job was to dry-brush a little black here and there, particularly on tufts, to represent the singing caused by the explosion. I did this after the photos above and I think it improves it a bit.
Job done. Might be able to improve them a bit – probably by looking at others’ efforts at SELWG next week – but happy enough for now.

Leave a Reply