I wrote this post as simple instructions to go along with every one of the Cycle Profiles/Workouts that I post.
I tried to make it as simple and easy to understand as possible so that you can just get to your workout!
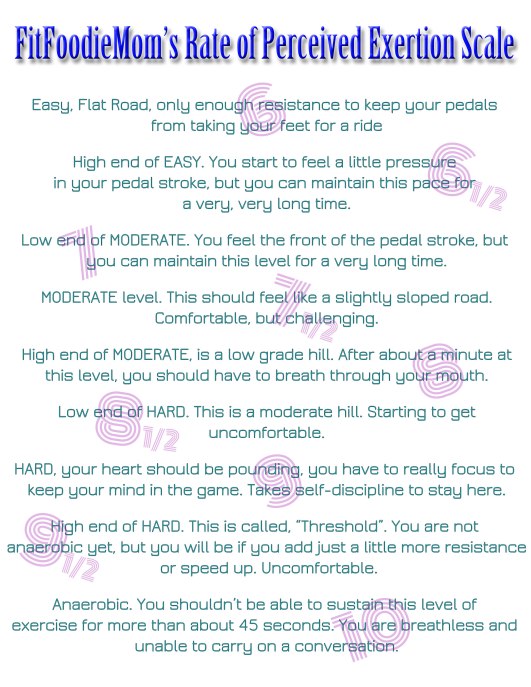
For Instructors: I chose not to use zones for a wider audience reach. If you want to translate my RPE scale to Zones, feel free! I made it really basic and actually used Zone terminology to describe each level. In fact, levels 6 and 6-1/2 are Zone 1 (easy and comfortable), levels 7-8 are Zone 2 (moderate and slightly uncomfortable), levels 8-1/2-9 are Zone 3 (hard, feel heart-rate significantly increase from Zone 1, extra body heat), and level 9-1/2-10 is Zone 4 (9-1/2 anaerobic threshold, near max effort; and 10, anaerobic, breathless, max effort).
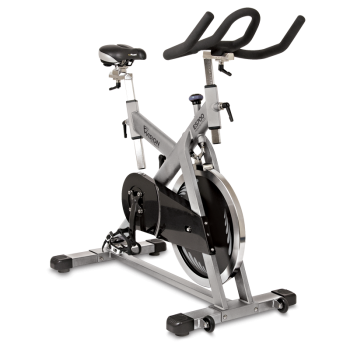
For those of you who aren’t instructors, ensure that the bike you use has a resistance knob on it (as seen in the group exercise room of a gym and in the picture to the left). Look at your gym’s class schedule and show up when the room isn’t being used for a class. Don’t be shy to enter into the big group fitness room by yourself, and don’t worry if there are a few other individuals using it. Put in your ear phones and enjoy your private ride. No one is looking at you or cares what you are doing. You are there to improve yourself, and you should be proud of that! If you do happen to show up while the room is being used by a class, you can either ask the front desk receptionist if you can pull a bike right outside the room or you can try to ride on an electronic bike that has buttons you push to increase resistance (like seen on the main floor of a gym). However, you might not be able to do the work-out exactly as written if you use the electronic bikes. They are very sensitive and can be frustrating.
*Click on the image to see my Rate of Perceived Exertion (RPE) Scale even larger. This is what I will be using to tell you how hard to work throughout my profiles.
Warm-ups:
I generally warm-up my class for 6-8 minutes. I use the first 2 minutes to warm up our legs and chat with the class about what to expect during the warm-up. We spin at a low resistance (LEVEL 6), which should feel like a flat road, but make sure you add enough resistance so that you are in control of your bike and your pedals aren’t taking your legs for a ride. For minutes 3 and 4, we stretch our upper bodies to release tension before we set into the proper position on the bike. Examples of stretches would be: Take a deep breath in and raise your arms up. Clasp at the top and pull up to the ceiling to stretch your shoulders. Clasp your hands in front and pull forward to stretch out your upper back. Clasp in the back and pull your hands backwards to stretch your chest. Grab your handlebars and round your back while your eyes look toward your stomach. Now, arch your back and look up to the ceiling. Repeat the last two stretches. Keep holding onto the handlebars and rotate your head to stretch out your neck. Shrug your shoulders and get ready to ride!
For minutes 5-8, I discuss form and increase the resistance just to level 7 or 7-1/2. I might alternate sitting and standing, or we might just sit and play with speeding up and slowing down a bit. The point is to get our legs ready for the workout portion of the ride.
Cool-downs:
I usually choose 2-3 songs for a cool down (7-9 minutes depending on how hard the last song of the workout was). We cycle on a flat road (LEVEL 6) for 2-3 minutes. Individuals can stand, sit, drink water, towel off, whatever makes them comfortable and decreases their heart rate. The rest of the cool-down will consist of stretching, beginning with upper body stretches on the bike. The upper body stretches will focus mainly on relaxing and releasing any tension that might have built-up during the ride. The higher tension you have after your ride, the more you’ll need to focus on proper form during the next ride! You can actually do the same upper body stretches we did in the warm-up, plus rotate shoulders.
Lower body stretches: Stop your pedals, and with your feet still attached, put them parallel and stretch your calves. Make sure your body weight is over the center of the bike and not over your handlebars. People have flipped forward! Get off the bike and stretch your legs. Put one leg on the bike seat, over the crank (the piece that the pedals attach to), or on the handlebars. Lean forward and bring your chest to your knee. Without taking your foot off of the bike, turn it so that the inside of your foot is on the bike. This will stretch your groin muscles. Repeat on the other side. Stretch your hamstrings by pulling your foot up behind you and holding your foot. You can use your bike to balance. Finally, take a few deep breaths in and congratulate yourself and anyone you rode with!
This is a nice video also discussing good post-cycle-workout stretches:
Finally, wipe off your bike and put it back where you found it! 🙂
Resources:
Powerhouse Fitness: Proper Indoor And Outdoor Cycling Technique And Form On The Bike and T0p 10 Mistakes With Indoor Cycling Technique
Fitbie: 4 Tricks for the Perfect Spin Bike Fit

