
Picture from our wedding photographer
EQUIPMENT
You do not need a huge amount of accessories for the flower arrangements. I already had good garden secateurs, so all I needed was some flower oasis, fancy parafilm and ribbon. I bought all this online and since I was planning to only do a bouquet, boutonniere, centrepieces and bunches, it cost no more than £20.
When you buy the oasis, make sure you get one that comes with a tray. Soak the oasis in water by gently placing it in the water and do not push down, let it soak the water up which will only take a few minutes. Secure the oasis to the tray with either parafilm or any kind of string and your oasis is ready for your creation. The ribbon and pin heads will be used to cover the parafilm used on the bouquet.
As for buying the flowers, have a look at my previous post on the New Covent Garden Flower market.
TIMING
I bought the flowers on the Wednesday morning and did the arrangement on the Friday for a Saturday wedding. It all looked fresh because I followed the instructions I gave earlier. I then kept it all at room temperature, in water (never in the fridge!!!!!).
START WITH YOUR BOUQUET
It will be super rewarding to start with the bouquet as you will realize how easy it can be, and also so you can pick the best looking flowers.
I have chosen roses as the main flower of my arrangements so I also used roses for the bouquets. For my bouquet, I did two, using 2 different styles of rose both ivory/cream, one with large roses and one with the wild roses. To make it greener, I scattered thin beargrass in between the big roses. I had no idea how they would look so I experimented and in the end preferred the wild rose bouquet. For my bridesmaid’s bouquet, I used the coffee break roses and thicker beargrass.
Tip: Tighten your flowers as hard as you can. They will keep fresh longer and the bouquet won’t move.
For the big roses, I only used 6 roses. You might use more if the flower heads are smaller than the ones I used. Do not be scared to pack them tightly. Hold the middle one first and position the 5 other roses tightly around it, and slightly lower. You want to create a ball of flowers. Once you are happy with the look of the bouquet, tie an elastic band around the stem and insert the beargrass in between the roses. I liked the beargrass in there, it highlighted the colour and the size of the roses. Hide the elastic with the parafilm, this will give extra strength to the bouquet and allow to have a smooth finish to the stem. You see on the picture below where the green parafilm is on the big white rose bouquet. It should be quite high so it is easier to squeeze the flower heads together. Cover the parafilm with the ribbon of your choice and pin it by inserting the pin at an angle all the way through the stem to hold the ribbon tight. For now keep the stem long so you can keep them into water for the night. Chop them to the edge of the ribbon on the big day.

Bride and Bridesmaid’s bouquets
Bear in mind that I had a tiny dress, very short and without laces, veil or accessories, so I wanted a small bouquet that would not hide the dress and clash in style. You can easily make a larger bouquet by adding extra rows of roses, and by starting with 3 roses at the top instead of one.
BOUTONNIERE

Using parafim will really make your life easy. I use the ruskus as a foliage only because that’s what I usually see on groom’s boutonniere. All there is to it is a pretty little branch of ruskus behind a short stem of wild roses, making sure you pick a stem with very pretty flowers and buds on it. You can have a boutonniere with a single rose, and add some ruskus behind it in the exact same way. The secret is the same as for the bouquet: use the parafilm to tighten the rose and ruskus together and keep it in water until you pin it on the groom’s suit. You can see on the picture below how well matched we were 🙂
 CENTREPIECE (S)
Make sure you have all the flowers you need set up around a big table. Once your oasis has been soaked through and tightly secured to the tray, start with the foliage. You want the foliage to act as a green background to enhance the colour of your flowers and as a covering for the ugly oasis tray. Always insert the stem on the foliage on the side of the oasis (if square or rectangular) and pointing downwards: this will help creating this green background and also provide extra support for the centrepiece when completed. Keep as much space as you can for the stem of your flowers so try using thick and fluffy foliage to use as little branches as possible. If you have too many stems going into your oasis, it will start crumbling away. Once you have done your foliage, start with the bigger flowers. Arrange them the way you want and do not worry about the oasis still visible, these are the final touches to your arrangement. When all your flowers are inserted in the oasis, start hiding the area of the support and oasis still visible with little branches left behind. I used Eucalyptus which did an amazing job at providing fluffy branches to hide the oasis at the beginning and lots of little branches to fill in the holes at the end.
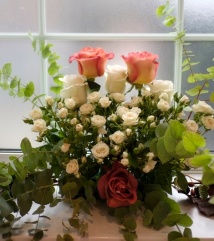
The way you arrange your flowers is up to you, I made some centrepieces with more burgundy colours and others with more creamed colours. I decided to wait until I finished them all to pick the best for my table. You can of course choose one style and make them all the same, but I knew I would run out of some flowers so I decided to mix and match. I made 2 actual centrepieces to go on tables. But I also made a “radiator” arrangement to hide my ugly radiator and another one for our open plan kitchen so all the rooms were filled with beautiful flowers! Water them everyday and you should able to keep them fresh for a few days, some of my flowers stayed fresh up to a week after the wedding.


BUNCHES
That was the easy part. Put together all the flowers and foliage you have left and arrange them together in a big pretty bucket. This is when you want to use these long stem roses that costed more, they will look beautiful in a big vase too. Tuck the bear grass back into your bunch to have these flying grass effect. (see also the photo at the start of the post)

