It always surprises us how BAD things get when you are in the process of organizing anything. The mounds of clutter, the piles of things that needs to be thrown or given away. Ugh! And doing this with a toddler who wants in on any activity didn’t make it any easier.
OK, I’m done with the whining. :0)
What really helped was knowing that our 5-year-old would end up having a creative and most importantly ‘functional’ space for herself. We wanted a space that would be easy to clean up because it wasn’t so cluttered and unorganized. Here are some things we had to think about when we were planning out the space:
- What does she enjoy doing there? (For her it was, writing in her journal, drawing, coloring, crafts, making cards)
- What items needs to be easily accessible to her (ie. her coloring books, crayons, etc.) and what shouldn’t be (ie. glue gun, beads etc.)?
- What doesn’t belong there, and why does it keep on showing up there? (toys, hats, coats, sunblock, etc.) and how do we address that?
- How do we label the different aspects of the space where it would be easily understandable by a 5-year-old?
After the initial mess of piling everything into groups and weeding out what doesn’t need to be there, we were surprised to see that we do have space! Here are a couple of organizing materials that really helped. I have to admit this was our THIRD time trying to make sense of this space. So I think these things really helped make this time matter.
We were lucky to be able to participate in the Brother P-touch program. We never had a labeler, I looked into buying one eons ago, but never got around to actually purchasing one (life happens). My experience with labelers were those dymo things when I was a teenager and it was never easy to use and I don’t think I ever really used that to organize anything either. Lately we’ve been pathetically using post-it notes and white sticker labels that you hand write on – I found one on the floor a couple of weeks ago and it took me a while to figure out where it goes! Some things that surprised me (as a novice labeler):
– It’s actually was quite easy to print out the labels – in the midst of organizing the space I really didn’t want ANYTHING that needed a learning curve. It was VERY straight-forward. In fact even inserting the label tape/ink cartridge was idiot proof with a drawing of the cartridge etched into the spot!
– The labels aren’t permanently welded in place after sticking them on. After a couple of weeks I was still able to move one label from one spot to the other – it was on plastic though, but still it transferred well and re-stuck well.
– You can’t beat how NEAT labels look compared to hand-written post its (yeah, I know… duh)
– The designs available were easy to use too – I used a plain rounded edged rectangle for most of my labels, while for my boxes and storage containers I used something that looked like a clipboard.
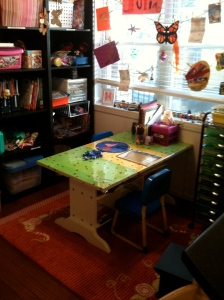
The way I organized our space – things Julia has access to in the bottom shelves, and more ‘storage’ items on the top shelves. I placed items first prior to affixing the labels in order to get a feel for where they are.
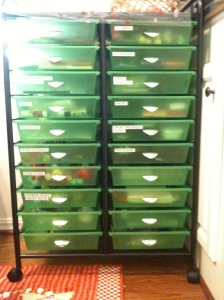
Arts and Crafts Double Tower
After going through multiple iterations of storage choices – ie. boxes, baskets, drawer units – We realized that having multiple places to put things just leads to more clutter and not much organization. By pure fluke we happened upon our local education/school supplies store’s back to school sale and found exactly what we needed! At first 20 drawers felt like a lot, but in reality it was just enough so that everything literally has a place and isn’t cluttered into one big drawer or container.
So now, scissors has a drawer of its own, so does tape, colored pencils, and markers – just to name a few, but you get my point. I also decided against going alphabetical, since this was to be used daily by my 5-year-old. I opted to go from most used (colored pencils, stamps, scissors, tape, markers) on the top half and less used on the bottom (pipe cleaners, glitter glue, pom poms, etc).
The final result is below! I have resigned myself to the fact that an area filled with all these minute items will never truly look pristine. But at the very least it is now functional, and best of all – everything has its place now. :o)

Re-positioned the table, made a new tabletop cover, reorganized everything and Voila! the new space!
One last tip — I found this plastic cloth-by-the-yard at Michaels that really helped make the table more interesting and like-new again – we simply taped it to the bottom of the table (much like when gift wrapping) and tucked some colorful tissue in between for color.
We aren’t exactly poster children of organizing, but there are two things that make us go through the rigors of organizing
— We seem to love our stuff and with two kids there never seems to be an end to the amount of stuff we have all over the place. With stuff accumulation comes the burden of organizing the stuff!
— We want our kids to live in an environment where they can actually have fun, relax, learn, and be kids – without the clutter, junk and mess.
— With the daily grind of life, things are hectic enough without the stress of trying to find something every hour or so. (Where are those pair of scissors? Where is that little empty drawstring bag? I swear I have a jar of googly eyes somewhere!)
— And with the ability of finding something and knowing where things should be, comes the $$ savings from not having to go out and buy more thinking that you’re out. (I wasn’t REALLY trying to accumulate 5 bottles of Elmer’s glue!)
Hope this helps somewhat 🙂 If you have any organizational tips please do share by leaving a comment on this blog post – would love to hear your tips!!!
Disclaimer
I wrote this review while participating in a campaign by Mom Central Consulting on behalf of Brother P-Touch and received a product and gift card to facilitate my review and a promotional item to thank me for taking the time to participate.
Related articles
- Reorganizing Our Arts and Craft Area (Heaven Help Us) Part 1 (declutterorganizerepurpose.wordpress.com)
- Label Challenge! Reviewing the Brother P-Touch Labeler (declutterorganizerepurpose.wordpress.com)
- Clever organizing tricks and storage ideas (cnn.com)


Leave a comment