The Joy of the Tweak


The joy of the tweak is something that many artist are pretty passionate about. Some artist don’t tweak images at all. Some think that tweaking someone else’s work is cheating. Then there are artist like myself that tweak other artist work, challenge artist to tweak as a means of learning as well as tweaking many of my own images.

If you were to ask ten artist about what the word tweak means to them, you would probably get ten different answers. Mine is just one voice and not many people will totally agree with my explanation of the term but it is something that needs to be discussed in my humble opinion. So, in the next few minutes you will not only hear me rant about this topic but visually see what the term tweak means to me!

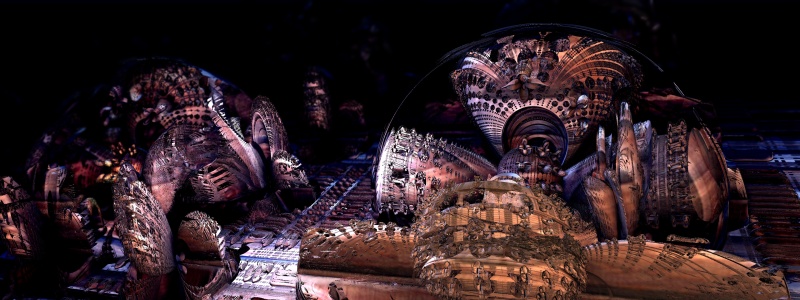
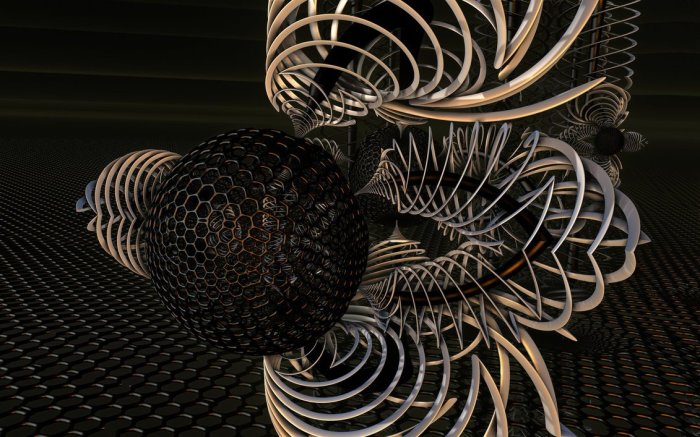
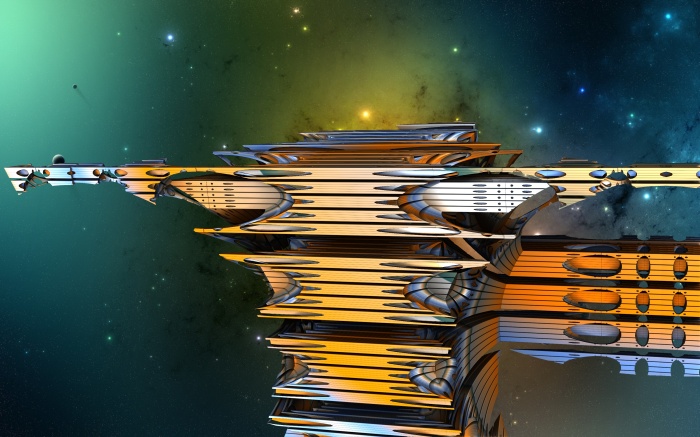
Let’s start with this image as an example and go through the different steps to tweak it.

Deceptive Stance
Deceptive Stance

Mandelbulb3Dv18{
g…..x/…i9…w….2E….PkFtDBOvnzmUAbYi1lB0EnXX35aOrsv9T9SD0RyMxzgPTOyUCQtwj
…………………………..lQYEuUE2/02……..Y.Jpr…….E……..Y.2…wD
…Uz6/…U9/…/A60/…..k6d…G0…2E4…..6fmAFMcY/gD/A6GzuKEKCiW0dkpXm1.lJJJ
.3k2adBD12../2kAnAnAnA1../………k……..Ez1………..U0…..y1…sD…../..
.wX0LD0Dv0Av048NEv1ovYqVC4icvMwQbKdkPfTjm3h/uPcUIr1F1JzNmR/oyW11A9QJ7YeDGvJx/pIL
ur9dnKClJZEey8hgPOaQL.hjU…UznSl0..UP/..2….sD12….sD..G…………………
………….oAnAt1…sD….zw1……………………………..E74hhEG….k1.
…..4iSoz1…..mzzz1wzzz1.U..6.3….c/…EB….e/qF66/..UED….2/…MVz…UJFb0
…U.0aZczDM6/nzMg2czX6dE1E.0c..zrhe..UoK/nl2xvj6sM93P58iz1………..U.8.UQgk0.
.wUmc2beYz1.dA8E5ExwzC……….U2/3.6oKp/..R8Zc4xRczQmYEkti4xvD…………Gc..
mcV0..kuvBTuCfujYiySnbiney9………..l28.EITs/…………83yuedc8tz0.Ra9hwxv.k
.6U0.2FAZ………….klrlkCx9yj.6wTJHz2Vz1..UTVR..y3q/yzz/k.1A..1Ak.vzDsnwF.UDn
5VTzThdht0kaqaPiQs5y3q/.sLM5s1bTsLM5.UTVRUDlyVTVR..y3q/yMw5y3q/.sLM5snqTsLM5.UTV
RUDkzVTVR..y3q/y…y3q/bzz/k.1Akyz1yATomxzpaqaff…………………………..
E….I.3/3E…..I….Q….EHZtqNZ7LG4B3.s/EN…………………………U/4M..
………..OaNaNaNa1./……..zD……..kzXNaNaNaNapz………………………
………………………………………..E……..kz1…………………
…………………A…../….1….2IPVdLOiR460x4S.65…………………….
.Qk0……………..AnAnAnAnAzD……….kNaNaNaNawz………yD…………….
……………………………………………………………………..
…………………………..0….E….k…../pKMuZaPb/WEjV5……………..
…………5g……………………….A……….AnAnAnAnAzD……..Uz1…..
……………………………………………………………………..
……………………………………E…..4….A….UFjl4NdtqNUYYPo/0IjR5.
…………………c..6………………………./…….s2kxckpX0LDyz1…..
……………………………………………………………………..
……………………………………………..61…E/….4….6IRg7qPs/.I
jRbA.I4……………………..Qk0.YE0………….QNaNaNaNC.E………..OaNaN
aN4../……..zD……….2………./……………………………………
…………………..DsyneGrafix…………………………}
{Titel: Deceptive Stance}

The formula’s for this image are as follows: MengerIFS, Amazing Box, Amazing Box, Folding Int Pow and Bulbox. Without changing any of the formula’s or rearranging them there is still lots we can do to affect the image itself. Our first step is to open the Navigator and look around!

Navi Window
Navi Window

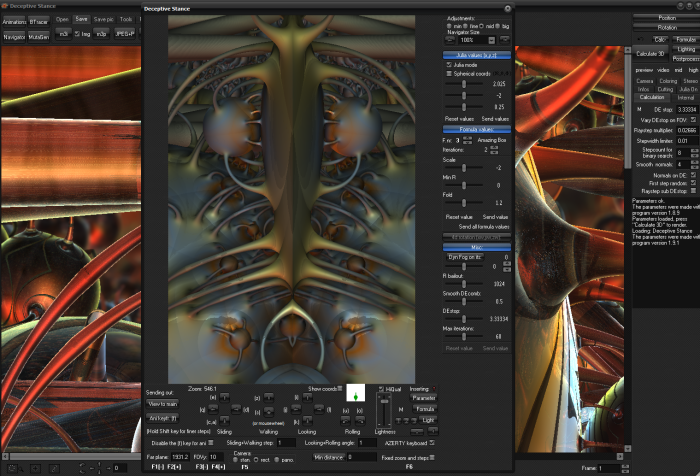
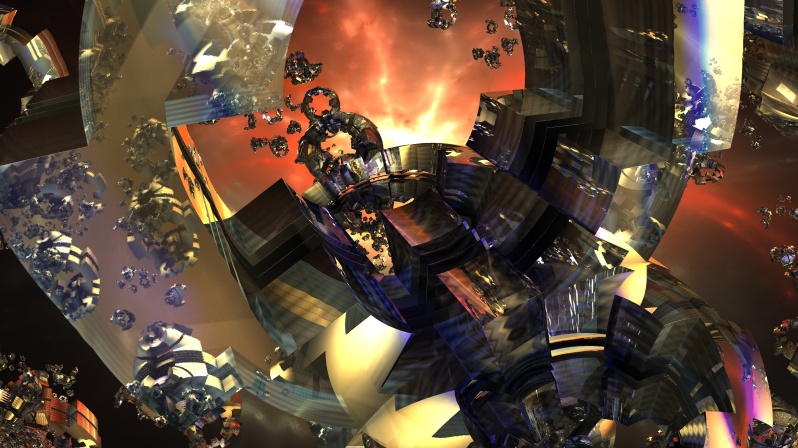
This is the most powerful feature of Mandelbulb 3D regardless if you are tweaking an image or not. So just changing the color of an image and calling it a tweak is not justified. There are so many easy adjustments you can do to change the image you want to tweak from the navi window. Not only can you zoom in and out, you can roam around in the image, change settings that affect the image itself such as scale, julia, far plane and more. So let’s play around with a few things and see what happens. With a tiny little adjustment to the MengerIFS formula the entire image has changed. By clicking on the Scale slider and changing the settings from 3.8 to 3.65 we get a completely different view of the image. This minor adjustment has completely changed the point of view of the image. But there is much more we can do in a short amount of time that will make the tweak much better.

navi2
Navi 2


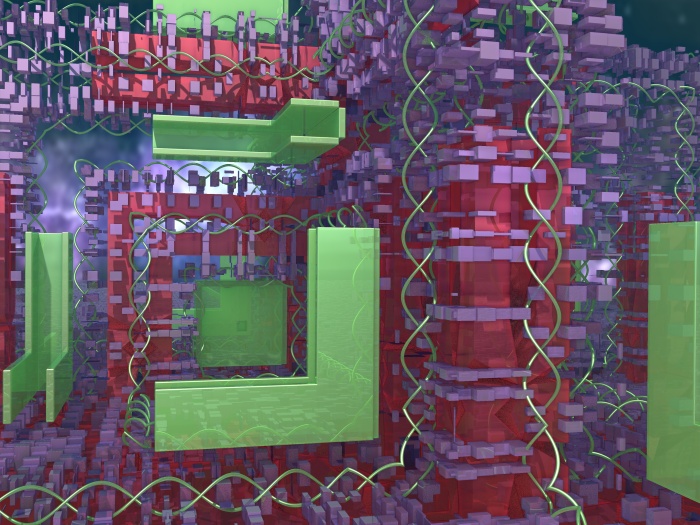
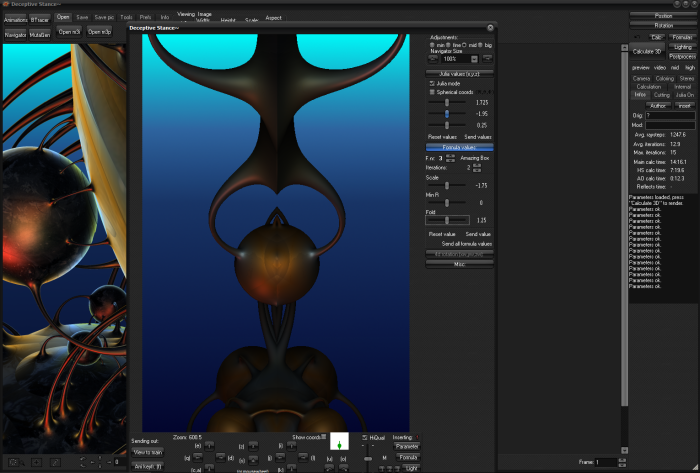
If we change the top slider of the Julia section from 2.875 to 1.725 another dramatic change will occur to the original image. Now we are going to remove some of the background clutter. Change the Far Plane figure from 1931.2 to 31.2. Now we are getting somewhere, but this still looks very close to the original image! Let’s click the up arrow on the F.nr: button and go to the second Amazing Box formula! A few quick changes here will do the trick! First change the Scale to -1.75 and then change the Fold to 1.2.  Check out the image below and compare it to the original we stared with!

Navi 3
Navi 3

Now send this to the main window so it can be rendered. But before we render the image let’s change a few things to make the render run much faster! The quality of the render will not be great, but we want to see how the changes we made have affected the original. We can tighten things up for the final render in a minute! The first thing we can do is click on the Postprocess tab and unclick the reflections and Depth of field tabs. Then resize the image to 1000 x 1500 so the image will render much quicker. Next change the Raystep multiplier to 1 and the Stepwidth Limiter to 1, we will change these later. Now click calculate and see where we are. My machine rendered this image, without hard shadows and ambient shadows in right at 10 seconds. The image in the main window should look almost identical to that in the navi window except for some noise in the form of white and black speckles that we can correct easily.

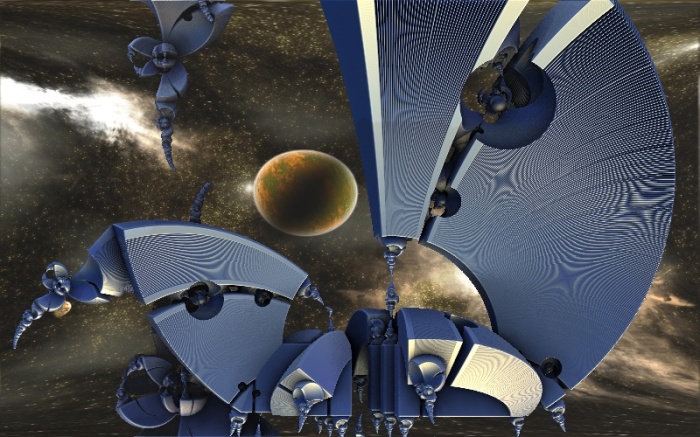
The next thing we are going to do is to add a blue gradient as a background. Download the image below and put it in the main Mandelbulb 3D folder you use.

Blue Gradient


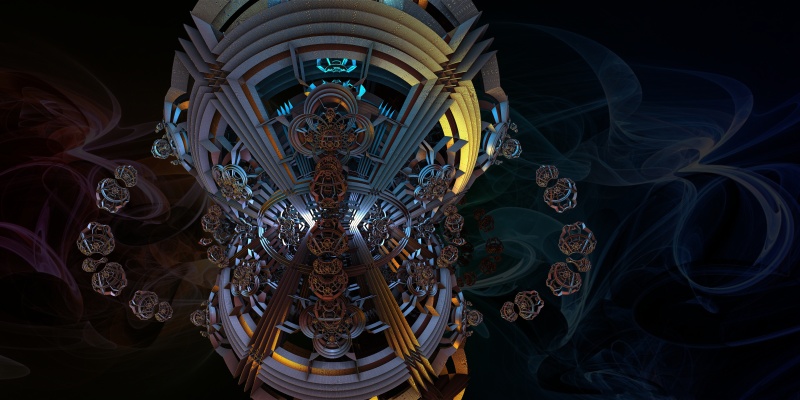
Once you have the Blue Gradient image downloaded to the appropriate folder we can apply it to the image. In Mandelbulb 3D click on the lighting tab and then on the “Back pic” tab! Select the checkbox next to Background image and a file folder box will pop up! Scroll down to the Blue Gradient image, click on it and open. You should see the image change right away!

Let’s look at the calculations tab next! There is some much to talk about in this panel, a lot of which is outside the scope of this article. However, we still have plenty to discuss. We are going to stay in the Calculations tab and clean up that pepper / noise we encountered earlier. To accomplish this, we will change the Raystep multiplier and Stepwidth limiter values. The issue with this is that when you use numbers that remove noise, smaller numbers are required to make this work, the time required to render the final image will increase. Now change the Raystep multiplier value to 0.02 and the Stepwidth limiter to 0.1. We will leave all the other settings that way they are! However as a rule changing the Stepcount for binary search value to 10, 11 or 12 usually works better and Smooth normals can be a 3 or 4. If you rendered the image with these settings you would have a cleaner looking image, but this strange banding would appear in the image! If you uncheck the Normals on DE checkbox and render, those bands will go away! This is a matter of personal choice, but the banding looks odd to me, so for the sake of aurgement let’s uncheck the Normals on DE checkbox.

panel

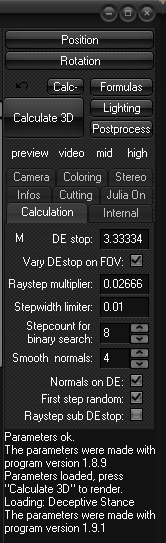
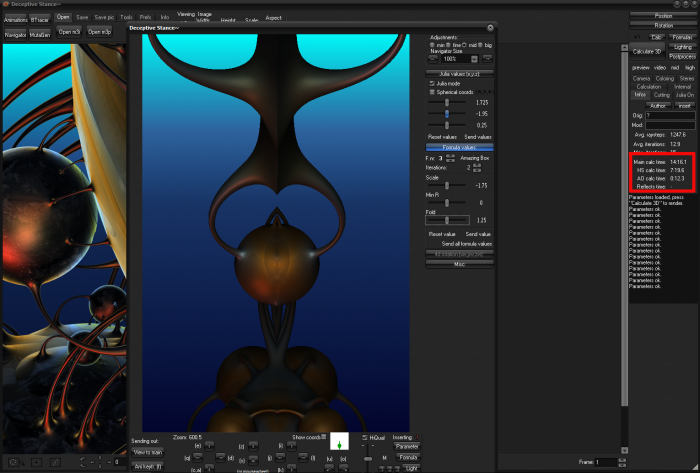
We still have not changed the size of the image, which will help remove some of the noise also, so the image you just rendered should still be 1000 x 1500. Before we change the size let’s see just how long it took to render at this size. refer to the red box below. Notice that this is the Info tab and after you render an image, the software always post changes to this screen to reflect the “Main calc time”, in this case 2 minutes and 16 seconds. The “HS calc time” , or hard shadows, 1 minute and 16 seconds and the AO calc time, or Ambient Shadow which took all of 0.02.8 seconds. That is some really quick render times, but the image quality is not where it should be.


Navi 4
Navi 4

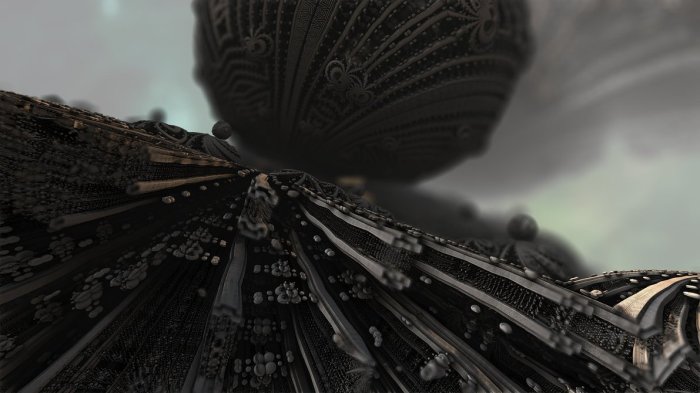
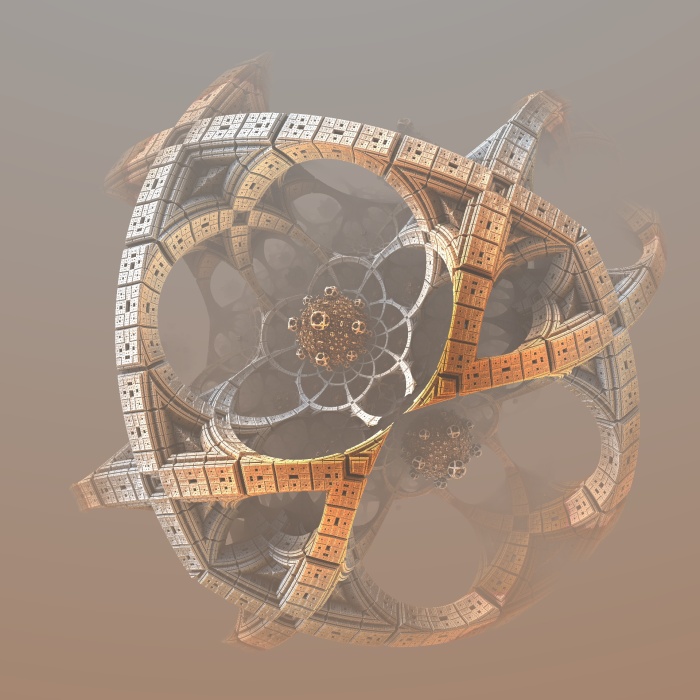
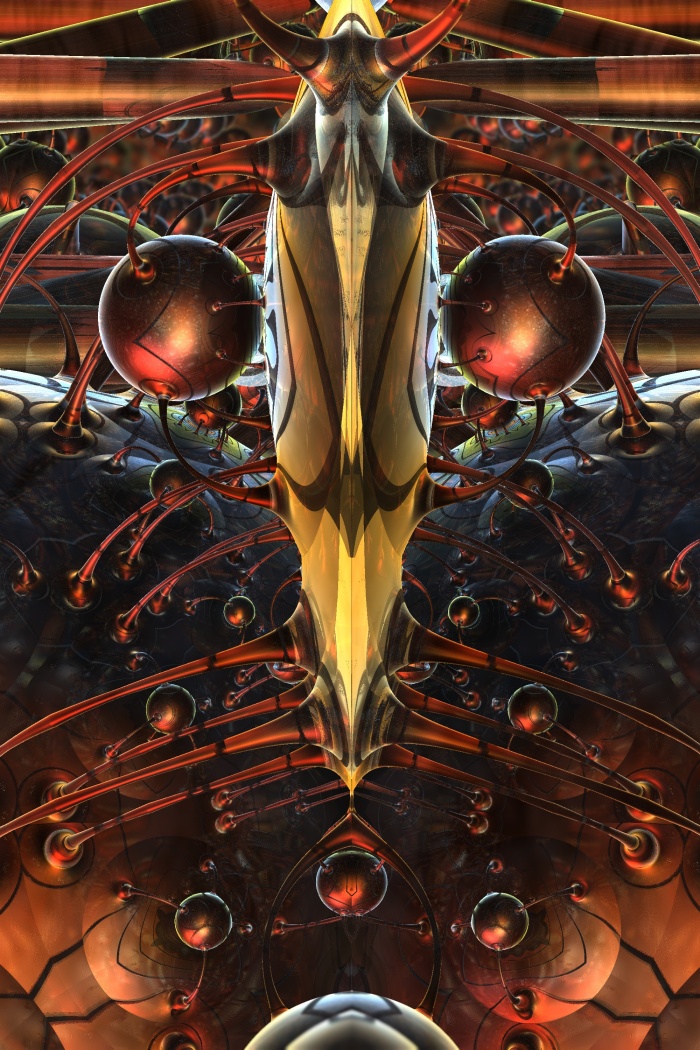
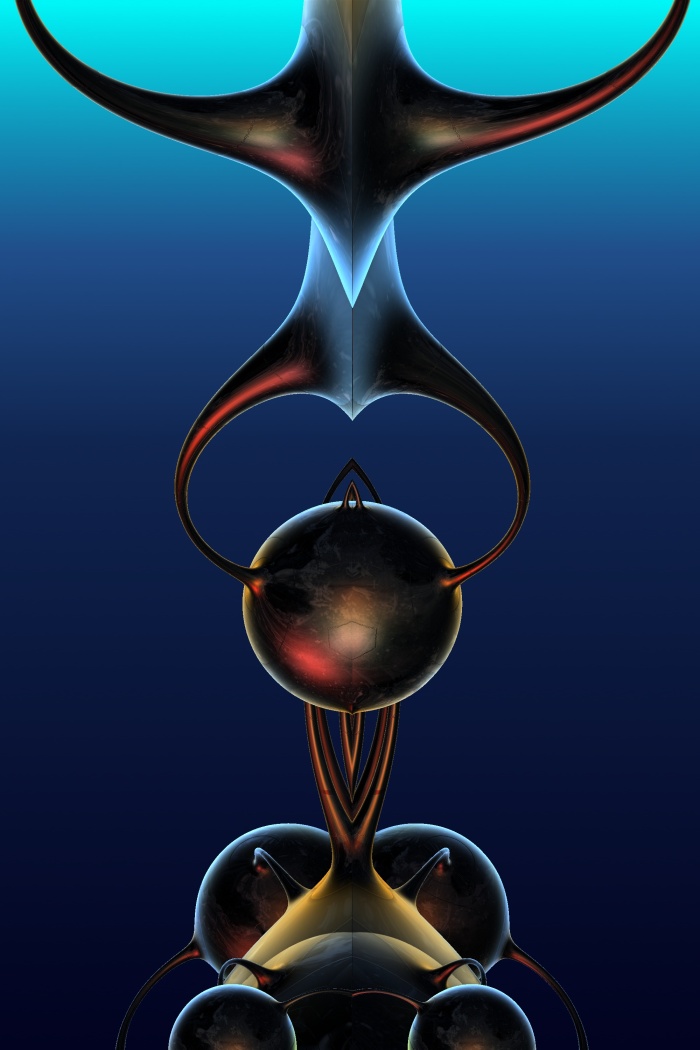
After increasing the size of the image to a respectable 2000 x 3000 size the render will take approximately 20 minutes without shadows. Naturally if you add reflections and / or depth of field render times will increase. However the image looks okay without reflections and depth of field would not benefit us with this image. So here is the final render, with hard shadows and ambient shadows applied. The point to this really about taking just a few extra minutes to actually tweak the image and make it completely different from the original. Thanks for taking the time to review this material.  I hope you have found this educational or at a minimum thought provoking.


Taking a Stance
Taking a Stance


Mandelbulb3Dv18{
g…..x/…i9…w….2E…ktXc6LfVrnzuWG/Hru9tujAAonl95lsvfZ2X8ZQ/Nxz.l3XtiQxswj
…………………………..nr2PMJzk002…….gQ.BM……..E……..Y.2…wD
…Uz6/…EA…..As0/……/Z…70…2E4…..cV6vkAMFrfD/A6GzuKEKCiW0dkpXm1.lJJJ
./U0LD8D12../2UaNaNaNatyzAnAnAnAnwzj……..Ez1………..U0…..y1…sD…../..
.wHnAnQDCmgi71Koxu1mrUHOnjGYvUrPddqEhVSj9G2m.jmd0r1Fo7sKwHIjyabt9SC23PdD5nqm/2Yy
brPhUHLuEIgZyyNtBY3z2pfjU…UzH6N…zA…2….2E02….sD..G…………………
………….oAnAt1…sD….zw1……………………………..E74hhEE….k1.
…..4iSoz1…..mzzz1wzzzX.U..6.3….c/…EB….e/qF66/..UED….2/…MVz…UJHb0
…U.0aZczDM6/nzMg2czX6dE1E.0c..zrhe..UoK/nl2xvj6sM93P58iz1………..U.8.UQgk0.
.wUmc2beYz1.dA8E5Exwz4……….U2/3.6oKp/..R8Zc4xRczQmYEkti4xvD…………Gc..
mcV0..kuvBTuCfujYiySnbiney9………..l28.EITs/…………83yuedc8tz0.Ra9hwxv.k
.6U0.2FAZ………….klrlkCx9yj.6wTJHz2Vz1..UTVR..y3q/yzz/k.1A..1Ak.vzDsnwF.UDn
5VTzThdht0kaqaPiQs5y3q/.sLM5s1bTsLM5.UTVRUDlyVTVR..y3q/yMw5y3q/.sLM5snqTsLM5.UTV
RUDkzVTVR..y3q/y…y3q/bzz/k.1Akyz1yATomxzpaqaff0lKRZ/mFm34NdJaPot0QiR4………
E….I.3/3E…..I….Q….EHZtqNZ7LG4B3.s/EN…………………………U/4M..
……….UBnAnAnAH1./……..zD……..kzXNaNaNaNapz………………………
………………………………………..E……..kz1…………………
…………………A…../….1….2IPVdLOiR460x4S.65…………………….
.Qk0……………..AnAnAnAnAzD……….kNaNaNaNawz………yD…………….
……………………………………………………………………..
…………………………..0….E….k…../pKMuZaPb/WEjV5……………..
…………5g………………zzzzzzzzvz9………………EzD……..Uz1…..
……………………………………………………………………..
……………………………………E…..4….A….UFjl4NdtqNUYYPo/0IjR5.
…………………c..6………………………./…….s2kxckpX0LDyz1…..
……………………………………………………………………..
……………………………………………..61…E/….4….6IRg7qPs/.I
jRbA.I4……………………..Qk0.YE0………….QNaNaNaNC.E………..OaNaN
aN4../……..zD……….2………./……………………………………
…………………..DsyneGrafix…………………………}
{Titel: Taking a Stance}


A comprehensive practical guide to adding non-fractal material


One of the members of the Facebook group Mandelbulb Maniacs and deviantart member for two years, Lyn Taryn has written this excellent tutorial that I just had to share with you! Describing the tutorial she says,


Tut image

“A comprehensive practical guide to adding non-fractal material in MB3D – Lightmaps, Heightmaps and Backgrounds. With tips on adding figures, animals etc convincingly post-render. It is aimed as a reference for the non-mathematical: beginners and the more experienced alike.

My aim was to create something like a chapter from the manual MB3D has never had, drawing together available knowledge and tutorials (with links as relevant) on these topics. This isn’t just an update of my original notes but a complete revision with new content. It also adds knowledge from others in the community too: including new clarification I received from artists at both DeviantArt and Mandelbulb Maniacs Facebook Group gave me while I prepared it.

In particular, I’m grateful to Dortus Gunst for contributing a list (with links) of different ways he has found to use heightmaps that go beyond the multiple tiling of the defaults. Gary Webb, and Lee Oliver added detailed advice on adding heightmaps as floors or other textured or shiny planes. Oxnot from Deviant also gave me guidance on handling the often neglected Heightmap2IFS. I am also grateful to those unnamed Deviants and Maniacs, who have also been quick to respond to my questions.”

This is definitely worth the time to download, read and study! Great Job Lyn !

You will also find a very good resource on her da page called

Notes in the Sphere Formulae

as well as

Notes on CylinderIFS settings


We look forward to your next tutorial!


Mandelbulb3D Tutorial Master Training


It recently occurred to me that tutorials regarding the Mandelbulb 3D where scattered all over the internet, with the bulk of them being on deviantart.com, but there was not a single resource a new user could go to find everything they needed to learn the program. So after days of digging around and another couple of days to put it all together I created such a resource! Just click on the image below to download your copy.

mandelbulb3d_tutorial_master_trainingV2-3


The name of this file was selected for a reason. If a new user were to use this as a training tool and go through all the tutorials listed within they would be a master of the program in short order! This file has been revised a couple of times and may be again as new tutorials are created and shared. If you have a tutorial that you created that does not appear on this list, by all means contact me and I will gladly add it.


9th Annual Fractal Art Competition 2016


Fractalforums.com is holding its “Annual Fractal Art Contest” for the 9th time in row in the year of 2016. Submission’s will be accepted through the end of May!

Prizes are, as every year, winning images printed on coffee cups.

Statement regarding voting system:
everything stays as it was in the year before, the total sum of gained stars in the voting process are the one and only thing relevant for the final outcome. We are aware that the process is not perfect. A voting system needs a whole rewriting of the whole process of the participating/voting for that where simply no resources available to create a voting/gallery system with a special voting system. Presumably the voting system will be changed at the 10th birthday of the competition, perhaps we will have found a sponsor by then as well…
Read below for a detailed description of current system.

The most important link for the compo comes first, the gallery is where everything takes place, uploading and voting. This is the link to the gallery section:
http://www.fractalforums.com/index.php?action=gallery;cat=113

Official Sponsor for this years contest is (again) : NO ONE, everything related prize giving and prize sending is handled by the administrator alone, a very long delay has to be accepted for prize receiving, due to this only the first placed entries in each section will get a prize. But remember, being part of it is all that counts!

Time Schedule
– Submission Period begins on 1st of May at 00:00 Central European Time
– Submission Period ends on 31st of May at 23:59:59 Central European Time
– Voting Period begins on 1st of June at 00:00:00 Central European Time
– Voting Period ends on 30st of June at 23:59:59 Central European Time

Rules:

*new, not obligatory*
Please sign your work, by placing the text “fractalforums.com Annual Fractal Art Contest 2016” inside your production you state crystal clear that you have produced it especially for the contest, and future viewers of the product will have a straight time location from when the product was produced. This was originally meant to be obligatory from the administrator but has been rejected by the admin people who thought that it would restrict artistic liberty too much, so make the admin happy and include it!

As every year, a contributor may enter up to 3 entries in each section of the competition, so every contributor may enter up to 9 total competition entries.

The Competition is (as always) split up into 3 sections, which are this year “Film”,”Still Frame Wildstyle” and as varying section we have this year the “Deep Exploration Mandelbrot” section.

It is desirable to publish “new” stuff in the contest, do not bore us with already known stuff. Anything already competing in another contest, or somehow already known to a wider public is unwanted. The administration team for the contest is not strictly excluding anything from the contest so it is up to you to either bore us to death or come up with inspiring new work. It would be to hard to verify every entry by hand, so nothing will be disqualified, but keep in mind that something already known wont get too much votes …

The whole voting and submission is done in the gallery. This year – for the first time – video submission are submitted by using the “Enter Video” feature of the current gallery, most of popular video hosting sites are included.

Remarks
Remark about the voting System
The winner is determined by the total sum of stars. Which means that a single 5 star vote can not outnumber  for example an entry with two 3 star ratings. Although there was an effort to introduce a new voting counting system, it will stay this way for this year – and presumably until 10th anniversary of the contest.

Remark about Time Schedule
Time scheduling caused confusion, due to contestants spread over the whole world, each of the schedules is a “soft” schedule, especially the entry time. If you come up with your entry half a day late ( but no more than a day), it is perfectly fine. Consider that entries which are longer in the view of reviewers have a better impact, and that later entered entries might get overlooked.

Remark about Voting System I
During the time of the submission period and the voting period the display of view counts and current voting is globally disabled in the gallery.

Remark about Voting System  II
Each section will feature 2 winners, one by the most total counts, and one by the best average count.

Remark about Gallery File Sizes and Dimension
The hosting package for the website is now at maximum, the allowed image sizes have been increased immensely, now 5000×5000 pixels and a file size of 25 megabytes is now enabled for uploads

The Competition is split up into 3 sections:

Competition Sections
Still Frame Wildstyle
The still frame section allows submission of any image without any restrictions, photography, layering, post works, painting. Express your feelings through an image. Attenuate Details, make use of modern image editing software to get the most out of your image. Single Click and render images might not be enough to become even recognized this year! Let your mind flow to create something new!

Still Frame Wildstyle Gallery section
http://www.fractalforums.com/index.php?action=gallery;cat=114

Deep Exploration Mandelbrot
This years third section is deep mandelbrot exploration. This section has 3 rules:
– Only pure mandelbrot, just escape time coloring, smoothing
– The location has to be shared within the image description
– Minimum zoom depth should be around 10^100

Deep Exploration Gallery section
http://www.fractalforums.com/index.php?action=gallery;cat=116

Film
in the film section (long) fractal videos are accepted. Let your creativity flow,
Use Voxel Stack exports to bring the Fractals into your favorite 3D Program. Use a camera tracker  to place Fractal Objects in real film recordings. Create a stunning soundtrack that is perfectly  synchronized to the film. Use Sound Syncing fractal rendering software that is nowadays available (jwildfire) Your creative mind might need an extension for this. This is the champions league of fractal art!

The film section now requires that you include the following text in the intro/outro of your production:
“Fractalforums.com Annual Fractal Art Competition 2016”
this is for specially recognizing it as competition entry.

include greetings as you like greeting other fractalists is a nice way showing we are alive

Film Gallery Section:
http://www.fractalforums.com/index.php?action=gallery;cat=115

Update


It has been way to long time since I posted anything to this blog and I want to reconnect with all my friends here and give you all an update of the latest goings on. My FaceBook Group, “Mandelbulb Maniacs” has taken off. We are on the verge of passing the 7000 members mark . The group has so many wonderful people that are very patient and kind and willing to share the beautiful art they create as well as tips and tricks with everyone else in the group. There are so many incredibly talented members that are there all the time and generously help new users navigate through the software. We have daily challenges plus a bi-monthly Master Class where we invite select members to sit on the hot seat and answer whatever questions the membership has for them in the 45 minute time frame allotted for the session. It is a very friendly place and in my humble opinion it is the BEST fractal art group on FaceBook!

Here are a few images I have tweaked from members of the group recently.

landscape_of_the_living_bulb_by_dsynegrafix-da3i9i8

Landscape of the Living Bulb


sphere_creation_process_by_dsynegrafix-da3lyzj

Sphere Creation Process

There is so much more to discover as we have members that push the envelope daily with some extreme fractals. If you are not already a member, I personally invite you to come join use and learn some leading edge techniques and interact with other fractal artist.